VMware Gateway deployment for local VM protection on the ESXi host
This article explains how to install the BlastShield™ Gateway OVA in VMware ESXi 7 where the Gateway is configured with VLAN addressing mode to work as an active Gateway. The Gateway can be used to protect other VMs on the hypervisor, as shown in the picture below.
Using VLAN addressing mode will allow you to connect VM endpoints to the Gateway and create a virtual air-gap network to protect the VMs against unauthorized users.
Authorized BlastShield remote users will be able to connect in to the VM endpoints over the BlastShield™ network.
The VM endpoints will be isolated from unauthorised users and the Gateway will provide protection against unauthorized lateral movement in the protected network.
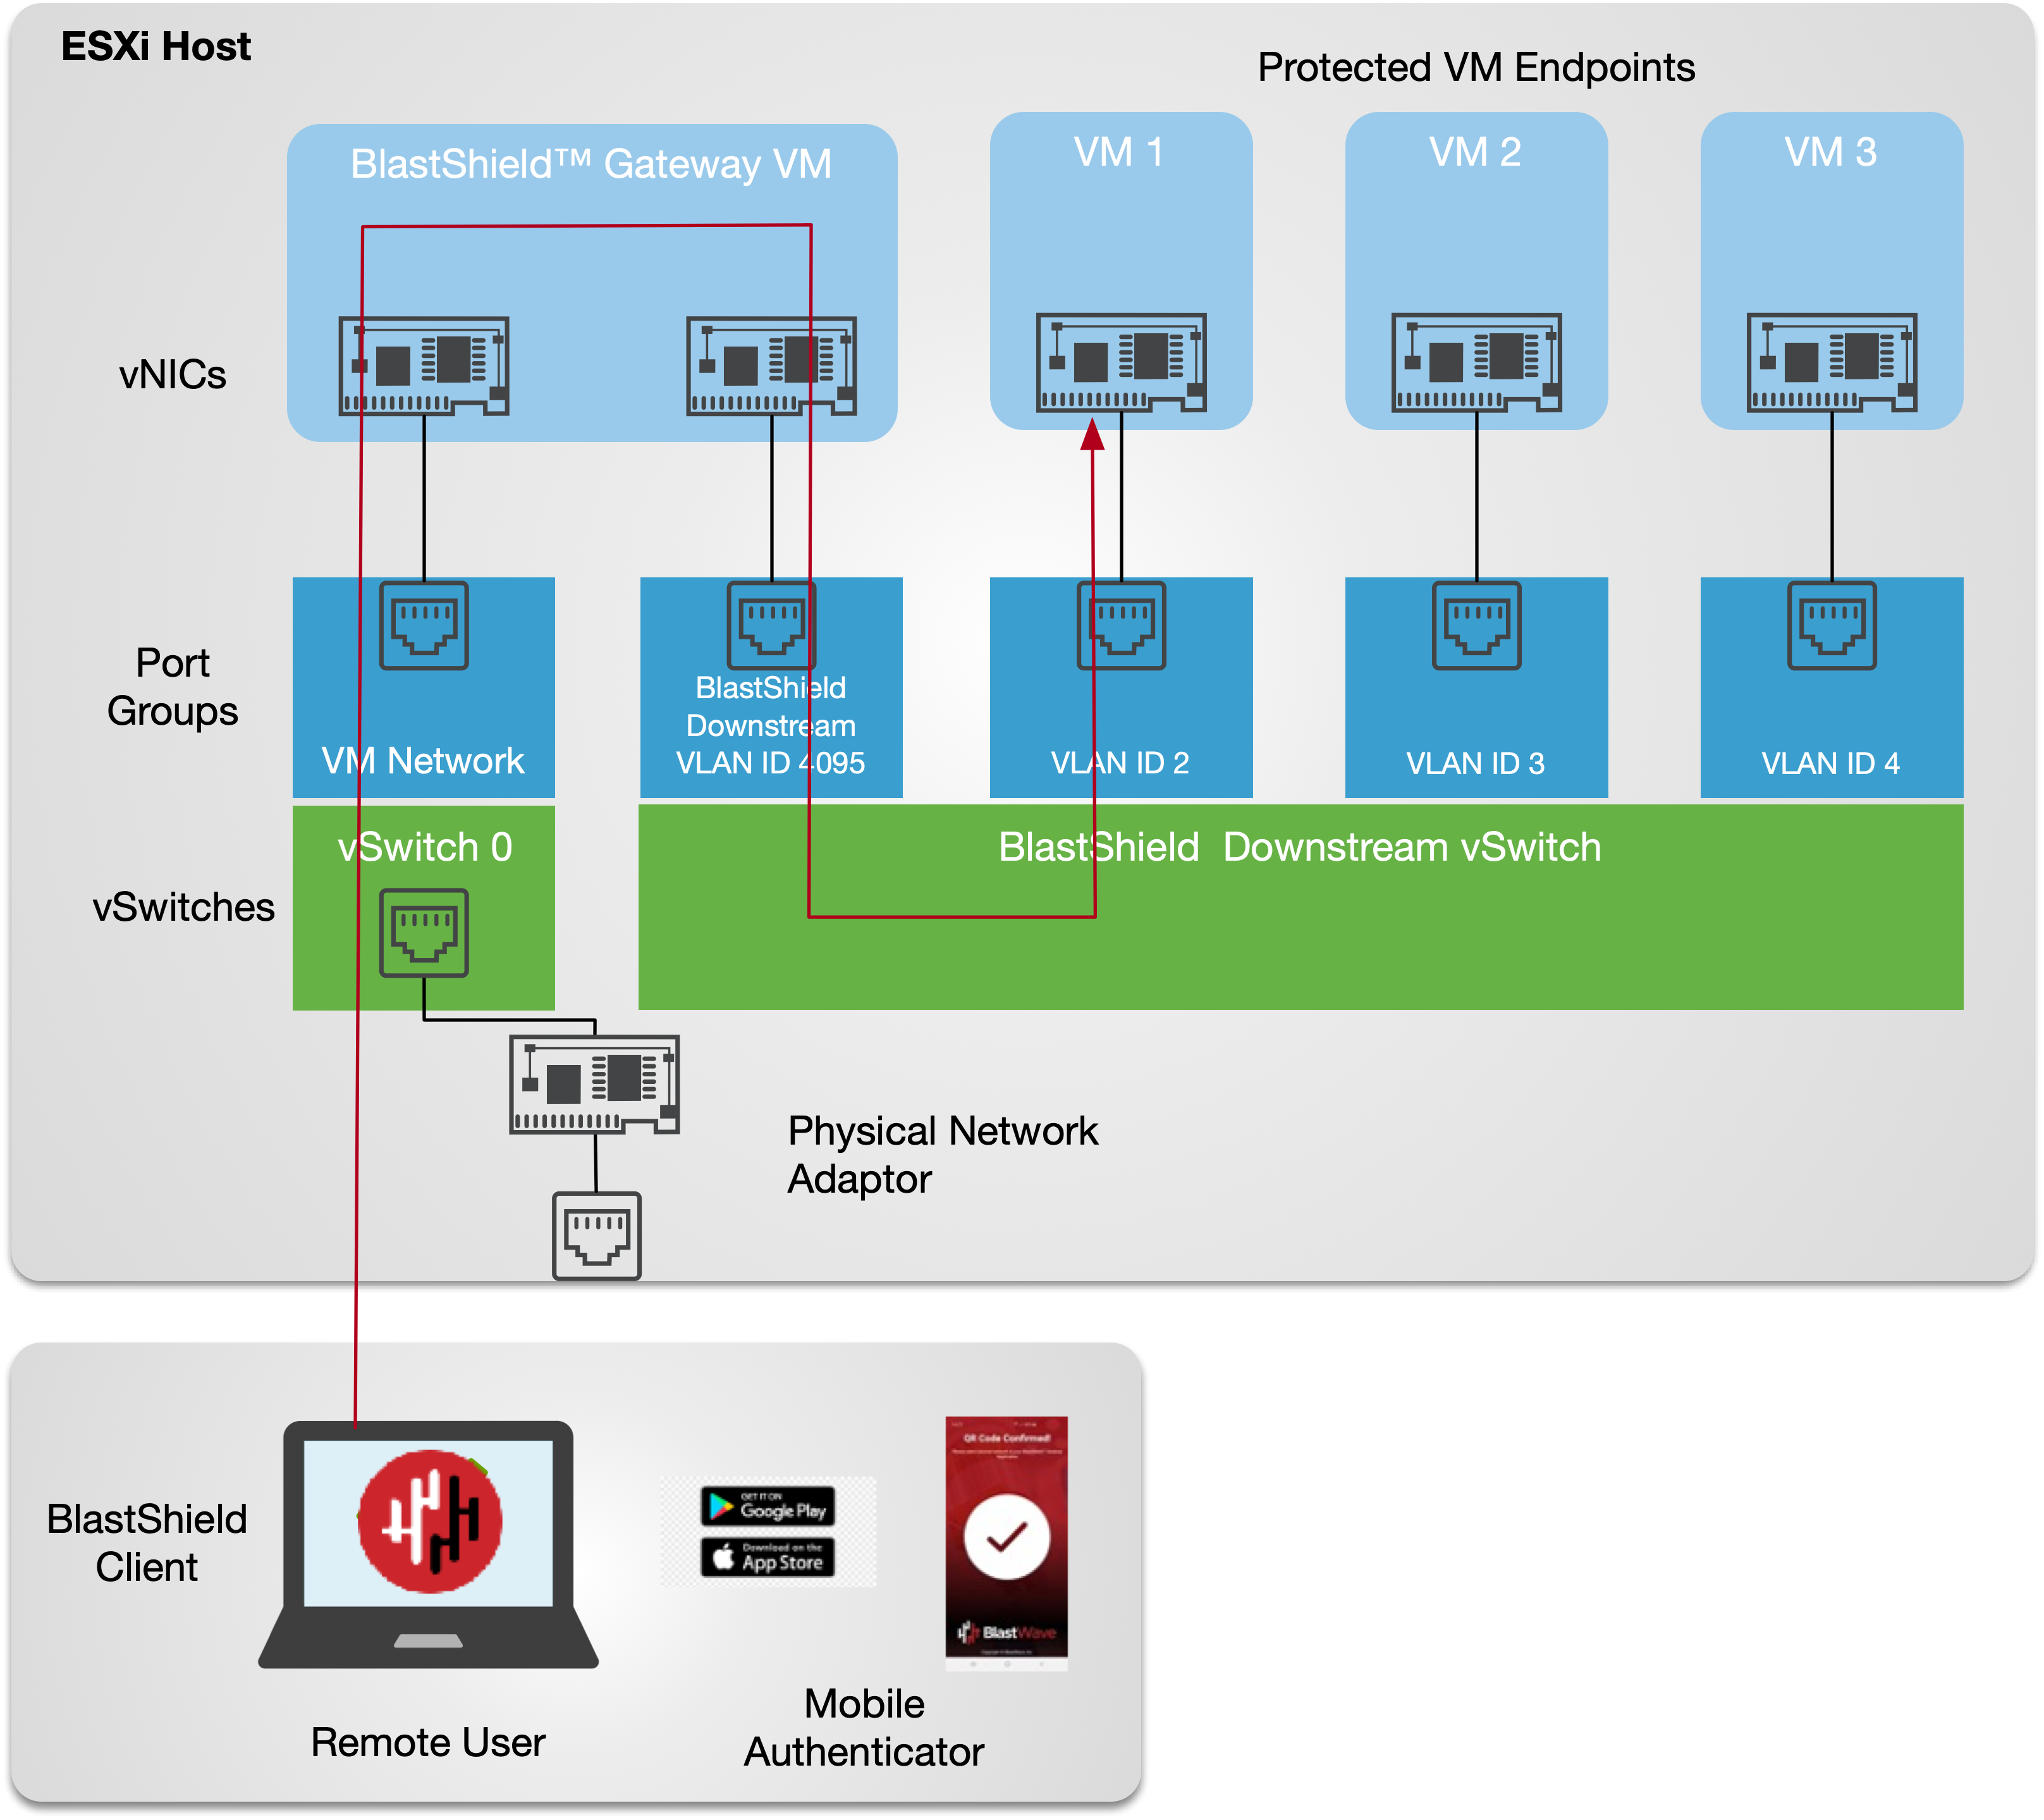 |
This figure shows an Active Gateway providing secure remote access and isolation of guest virtual machines running on the hypervisor. Optionally (shown), access to the VM kernel may also be protected by the Gateway.
A VMware ESXi7 hypervisor with admin access.
A BlastShield™ Orchestrator with administrator access..
The ESXi hypervisor requires at least one physical NIC which is connected to the internet.
You will require a copy of the Gateway OVA file. It can be downloaded from here.
If you are using vCenter, then do not use a distributed vSwitch for the ‘BlastShield Downstream’ vSwitch because these cannot support the necessary VLAN configuration on the port group.
By default, the gateway expects to receive an IP address via DHCP. Manual assignment is also supported during the installation process.
Outbound UDP ports to all required destinations.
Resolution of DNS requests must be supported by the network.
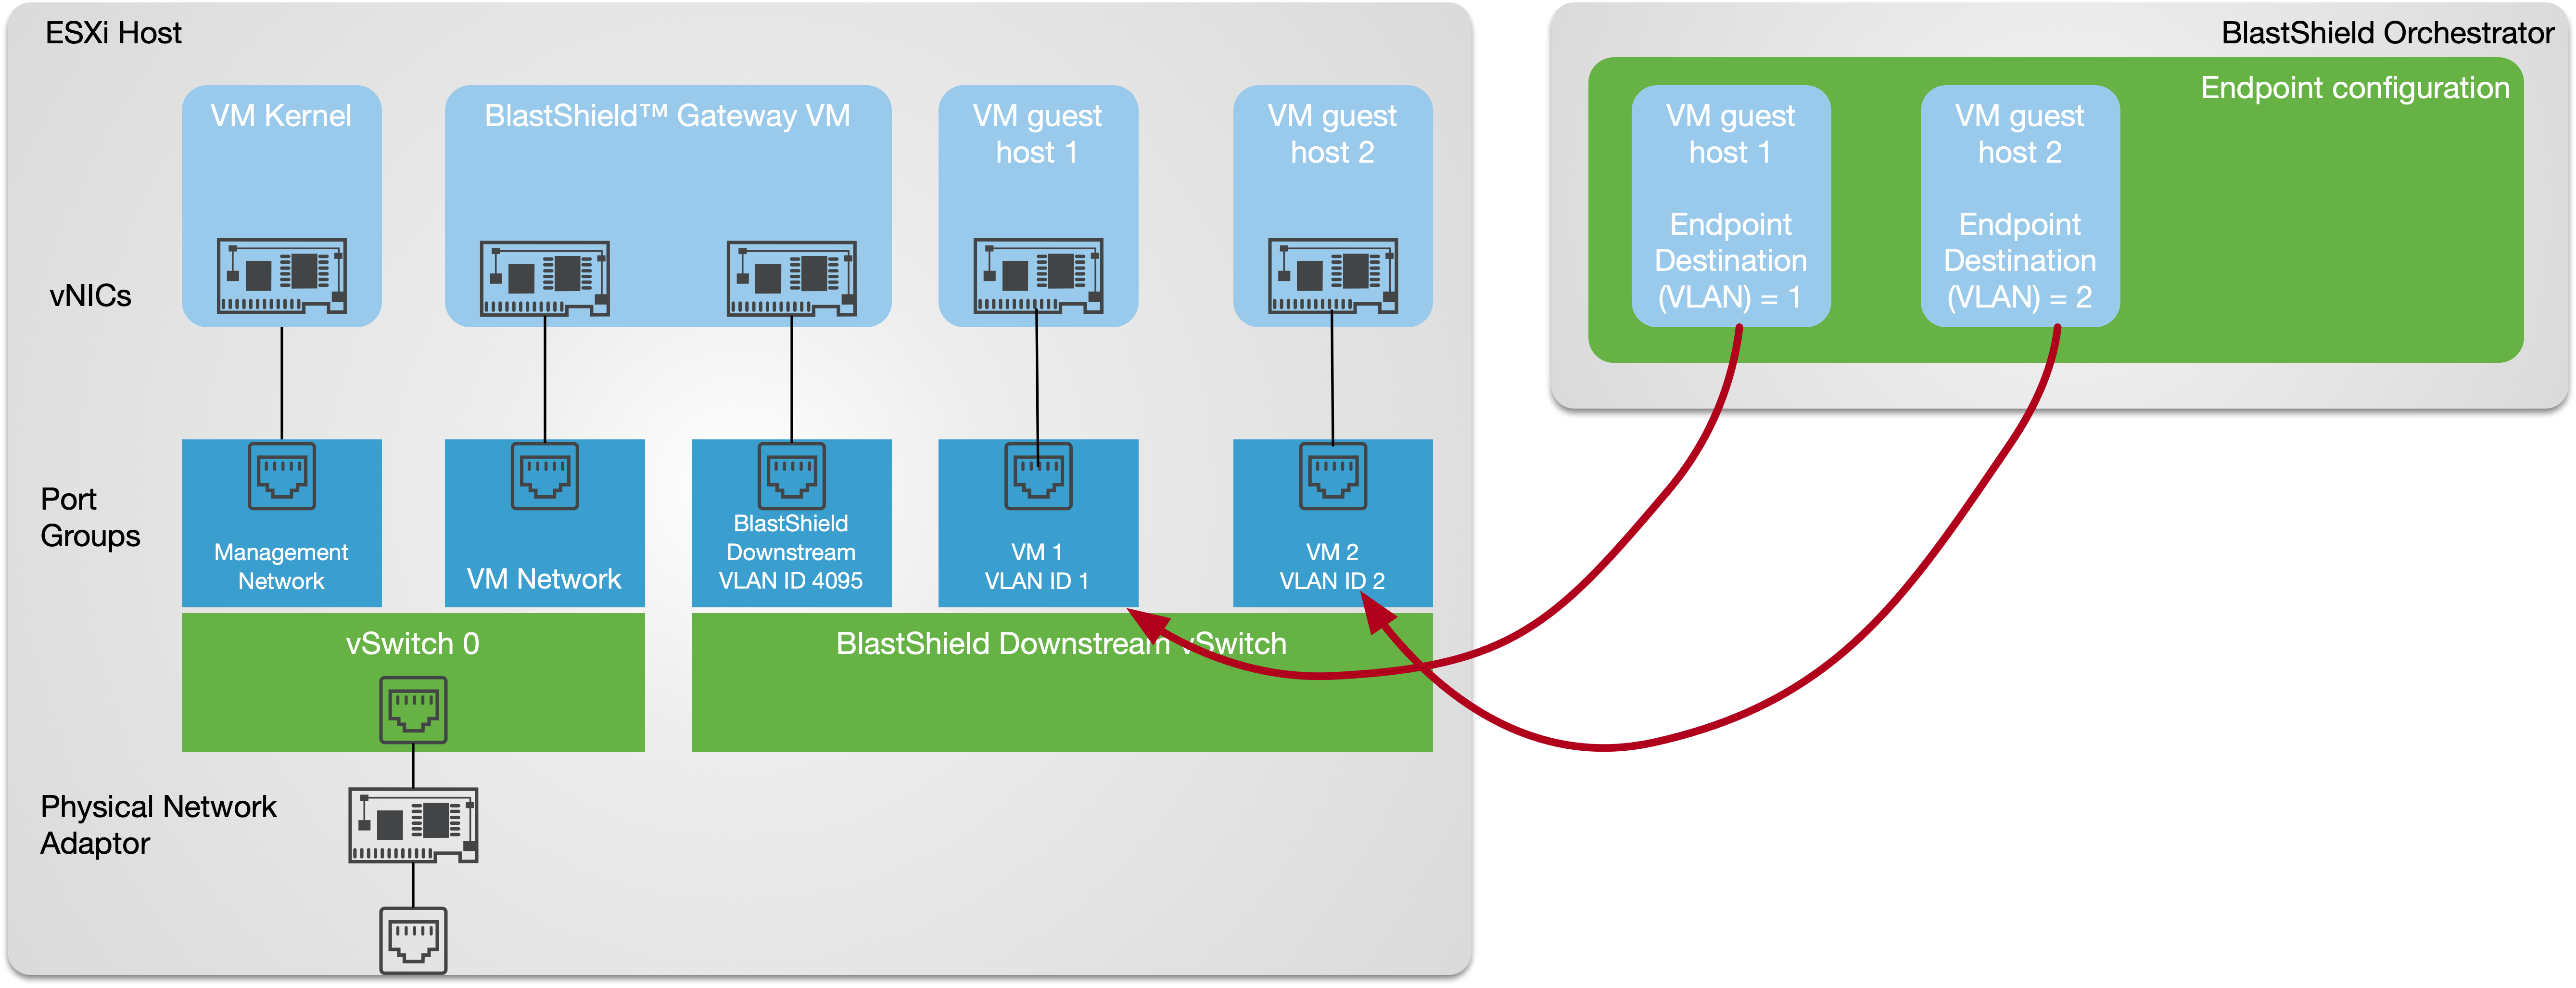
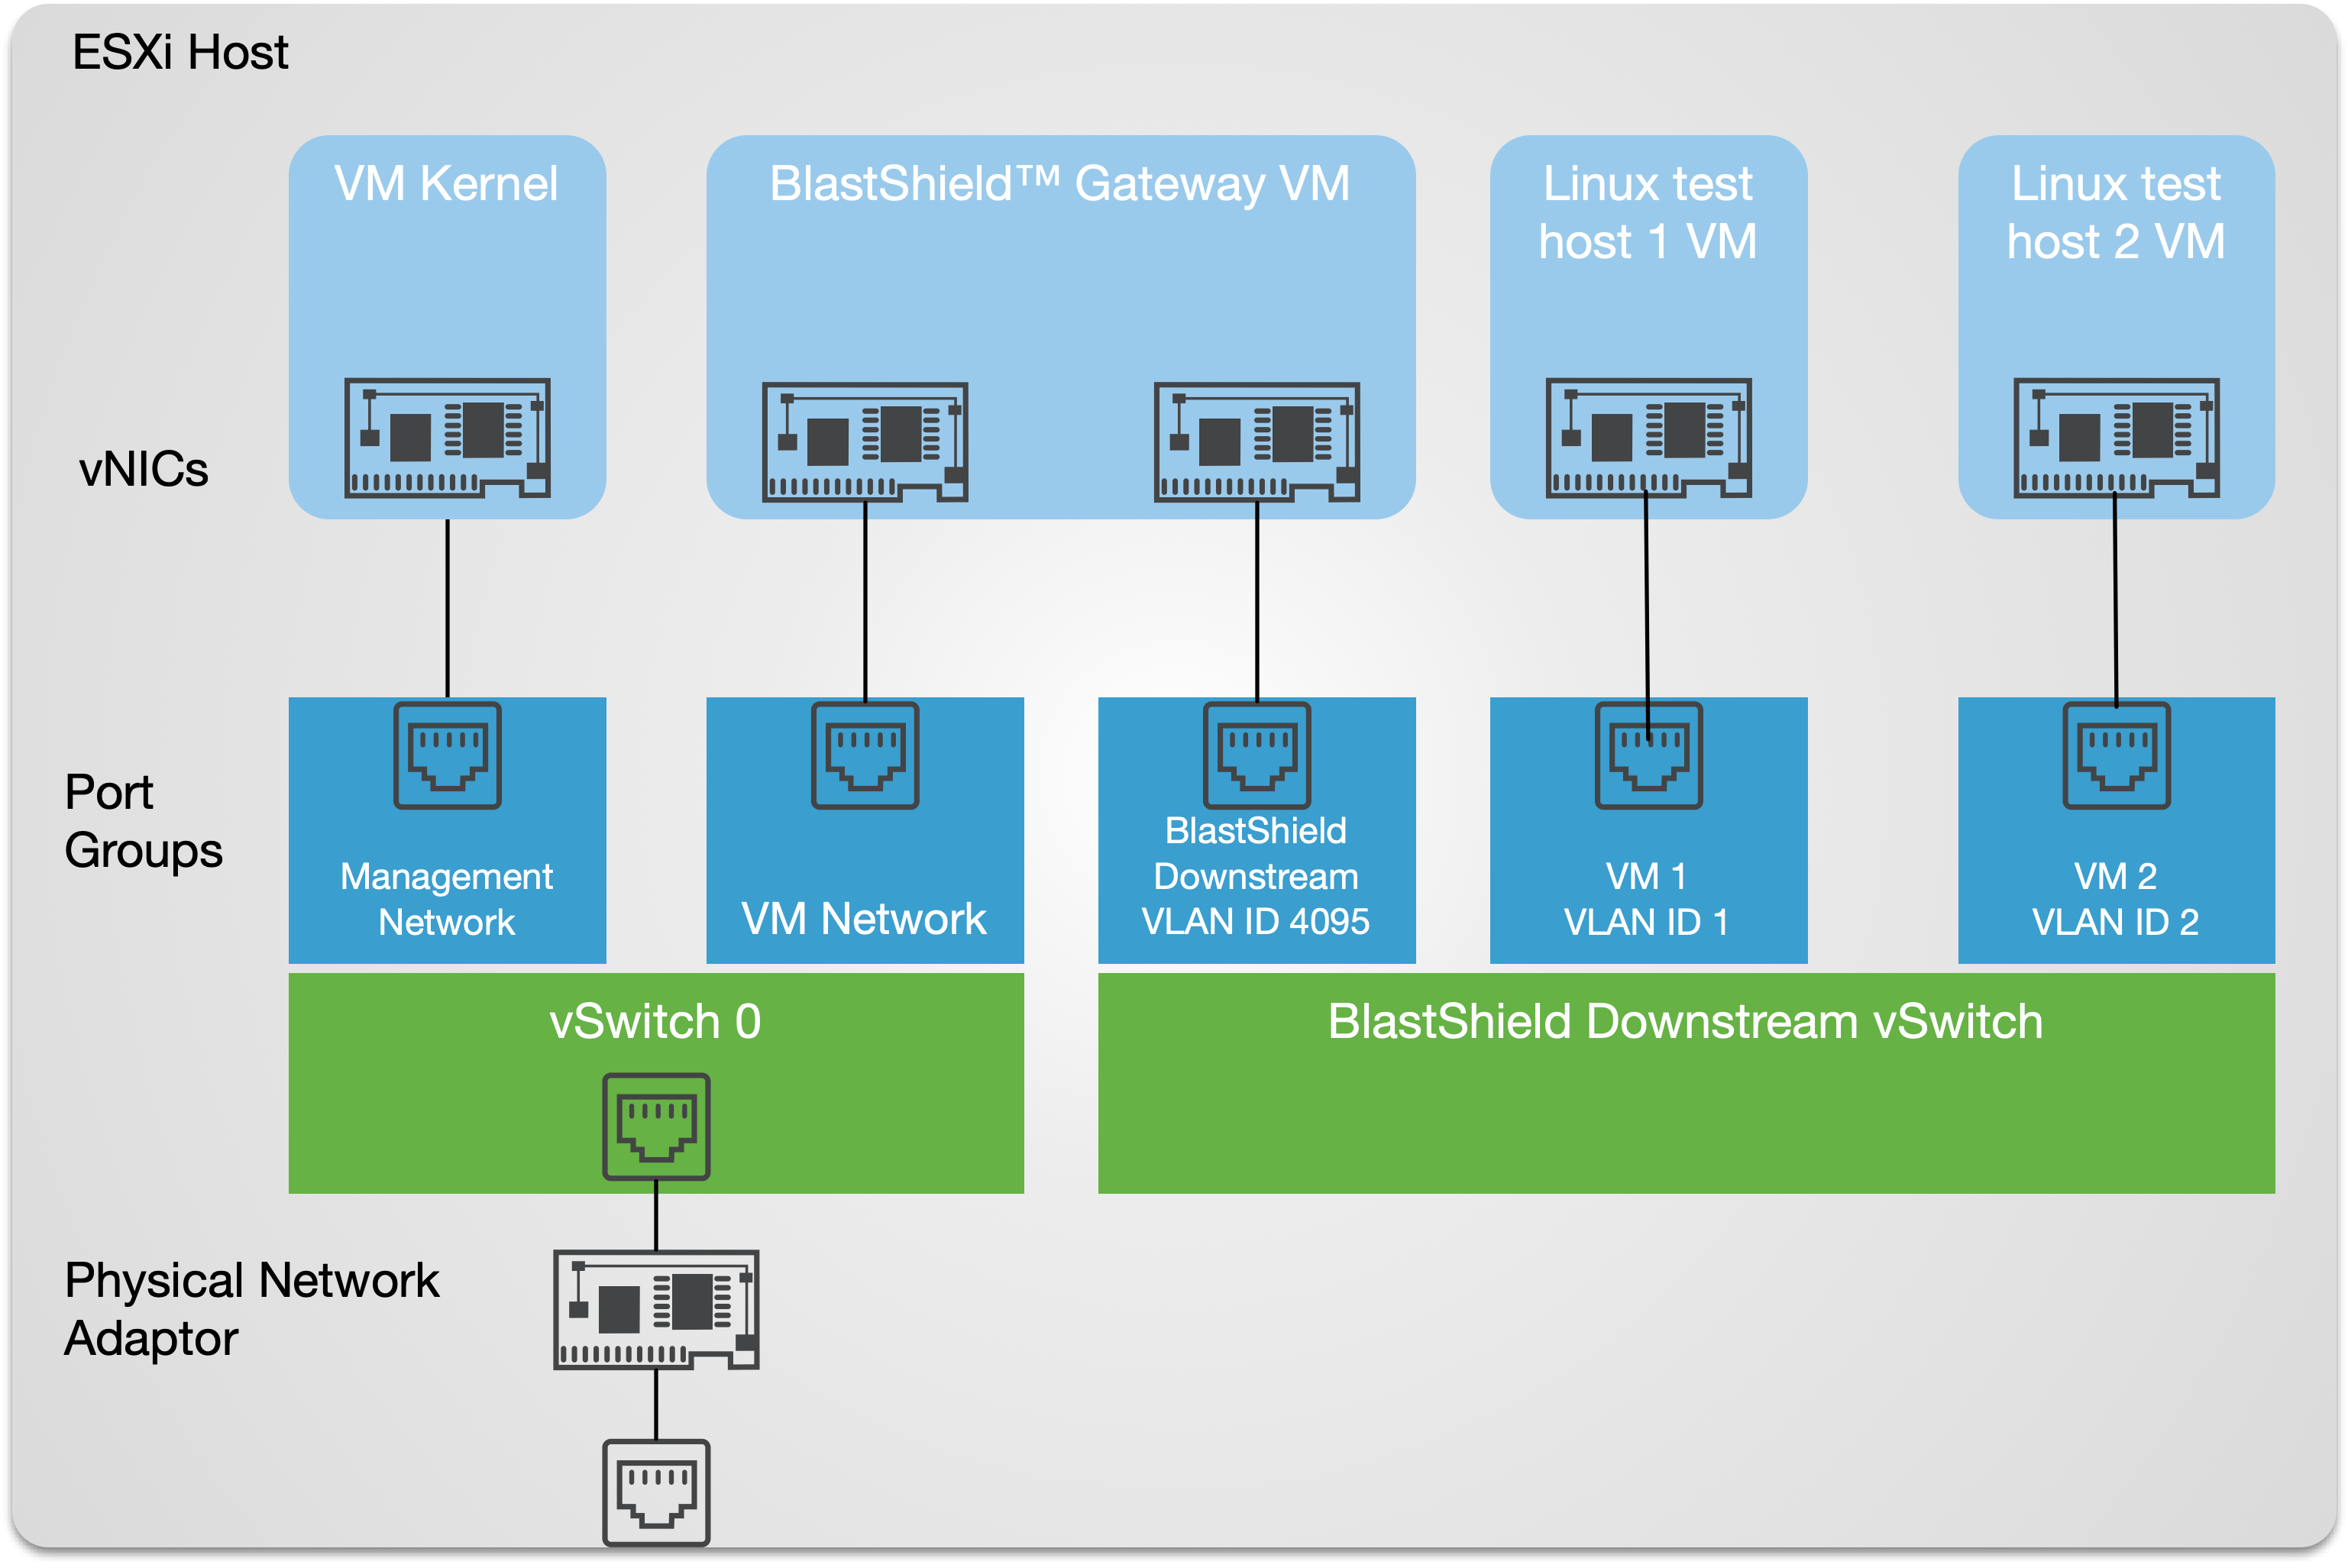
An overview of the VMware networking configuration is shown below. This shows the connectivity between the BlastShield™ Gateway virtual machine, the protected virtual machines, port groups and vSwitches.
 |
This procedure shows you how to add the BlastShield™ downlstream vSwitch and the port groups for the Gateway and for the protected VM endpoints.
From the ESXi host/Networking screen.
Configure the vSwitches.
Two vSwitches will be required as described below.
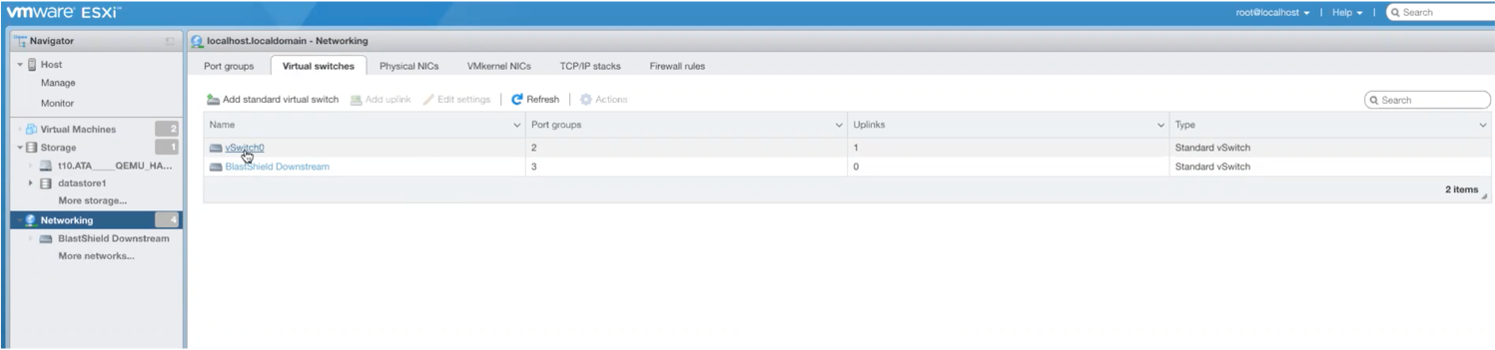
Login to the ESXi client, and select Networking from the left hand menu. Then click on the Virtual Switches tab at the top of the main window
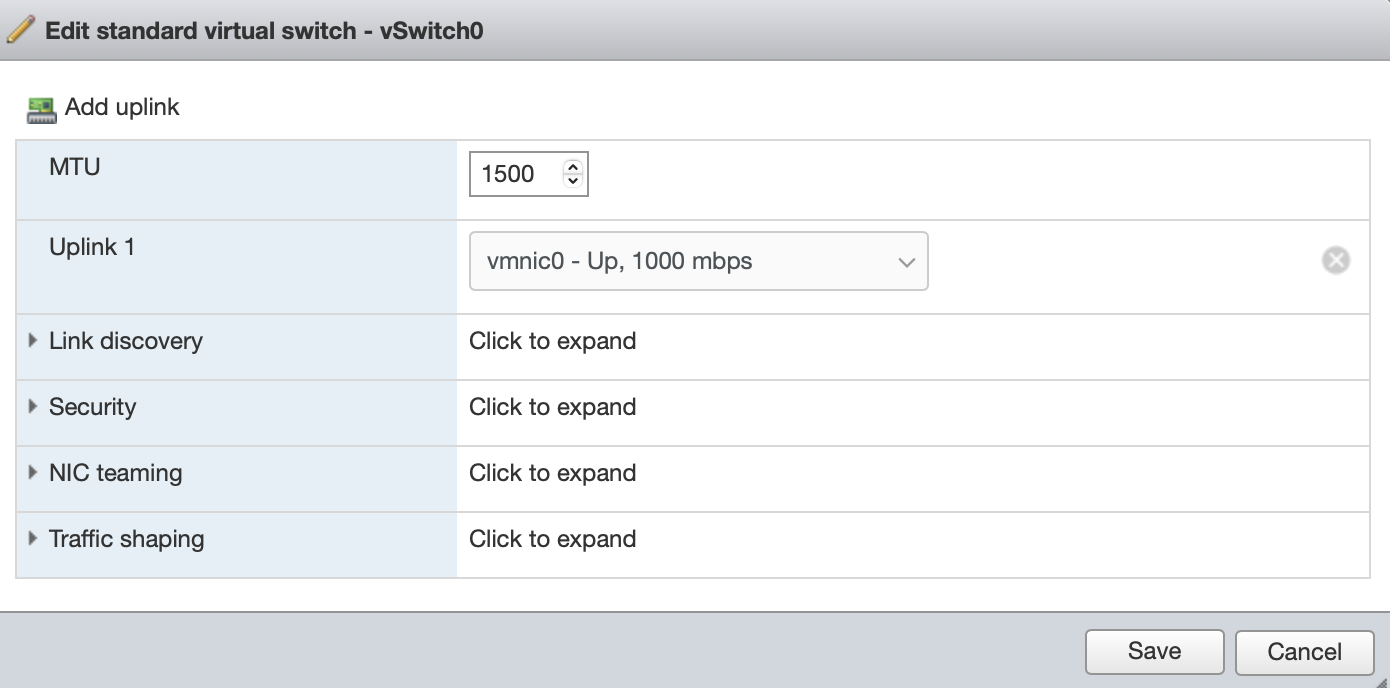
From the Networking / Virtual Switches view the existing vSwitches and verify the hypervisor has the standard vSwitch to provide network connectivity, as shown below, often referred to as vSwitch0.
vSwitch 0
This is the standard vSwitch for the hypervisor which should already exist. This vSwitch will provide the physical uplink for the Gateway.
If this switch doesn't exist then you will need to add it. Click on the Add standard virtual switch in the networking tab to add it.
Add a new vSwitch for the BlastShield Gateway.
This vSwitch is created for downstream protected traffic and the protected guest hosts will connect to it.
Click on the Add standard virtual switch in the networking tab to add it.. Give it the following settings
vSwitch Name: BlastShield downstream
It should not have an uplink to the external NIC and you should remove the default uplink.
MTA: leave as default
Link Discovery: leave as default
Uplink 1: The vSwitch should not have an uplink to the external NIC and you should remove the default uplink.
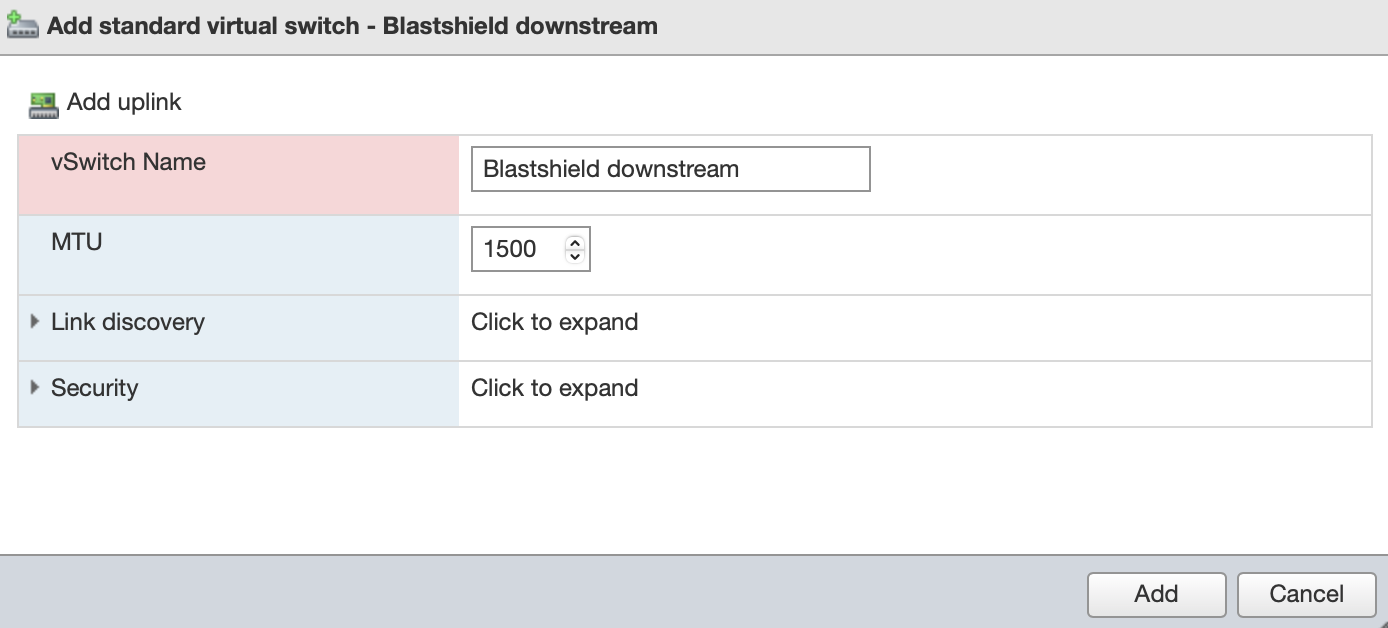
The completed vSwitich configuration for the Gateway is shown below.
Configure the port groups.
Add VM Network and BlastShield Downstream port groups for the Gateway.
From the ESXi client, select Networking from the left hand menu. Then click on the Port groups tab at the top of the main window.
Click on Add port group
Create the VM Network port group.
This port group is mapped to vSwitch 0 and is used to connect the Gateway instance to the network.
Name: VM Network
VLAN ID: 0
Virtual switch: vSwitch 0
Leave the other settings as default.
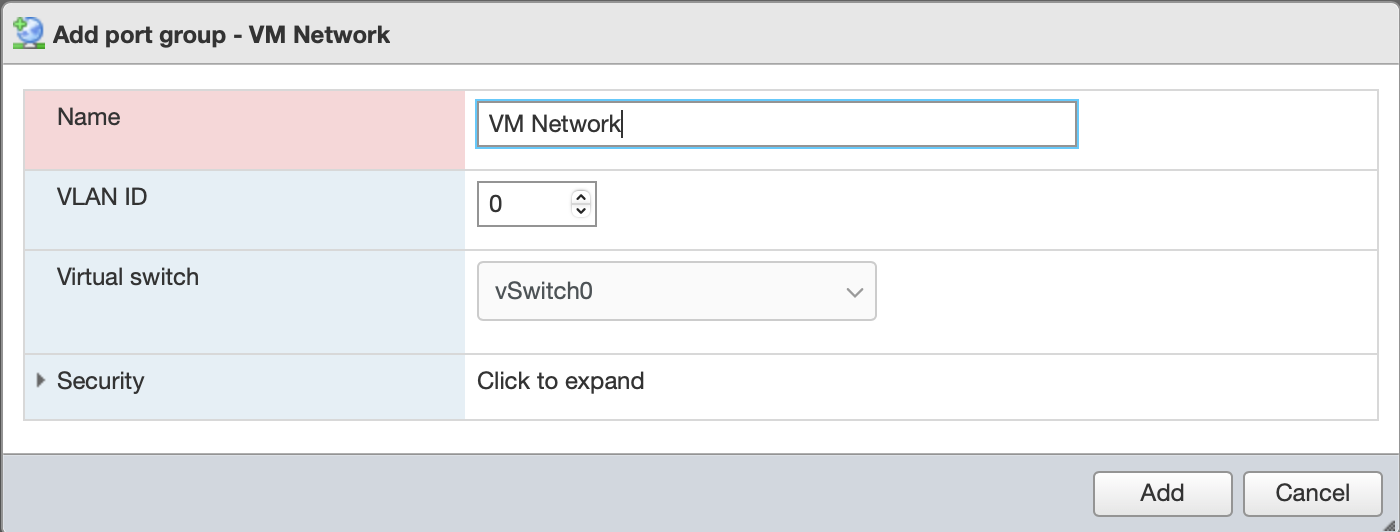
Click Add to create the vSwitch.
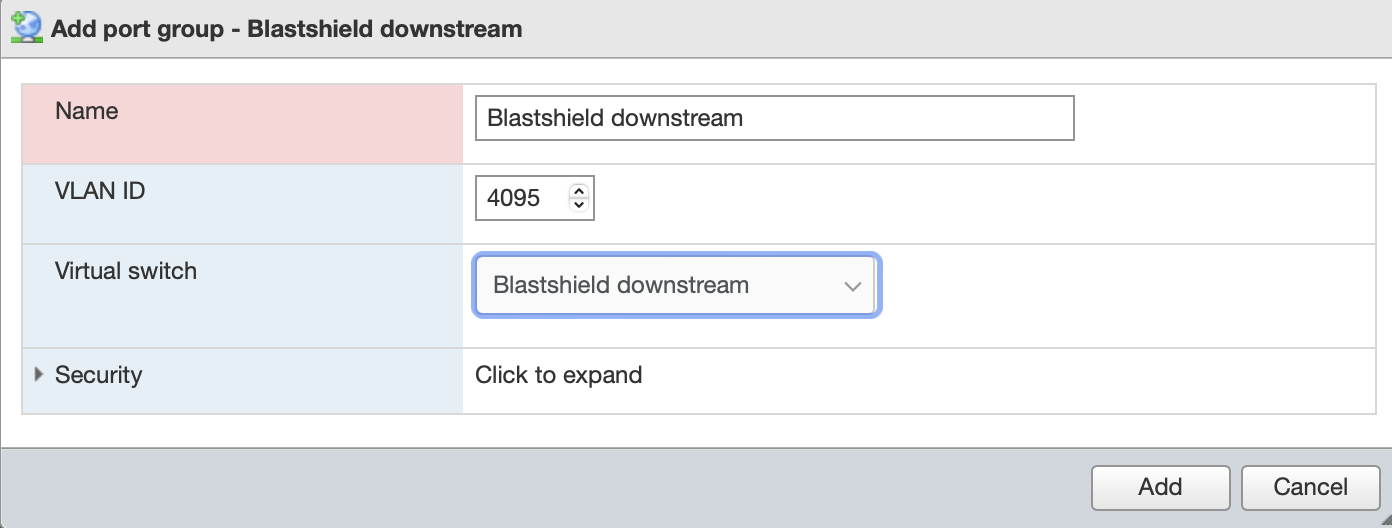
Create the Blasthield downstream port group.
This port group is mapped to the BlastShield downstream vSwitch. It is assigned VLAN ID = 4095.
Tip
VLAN ID 4095 specifies that the port group should use trunk mode, also known as virtual guest tagging mode, which allows the guest operating system to manage its own VLAN tags.
Click on Add port group.
Name: Blastshield downstream
VLAN ID: 4095
Virtual switch: Blastshield downstream
Leave the other settings as default.
Click Add to create the vSwitch.
Add port groups for the protected VM endpoints which you will connect to the Gateway using the BlastShield downstream vSwitch.. Each endpoint port group requires an unique VLAN ID which is used by the Gateway to identify the endpoint.
From the Networking User interface, add the following ports
From the ESXi client, select Networking from the left hand menu. Then click on the Port groups tab at the top of the main window.
Click on Add port group.
Name: VM1 port group
VLAN ID: 1
Virtual switch: Blastshield downstream
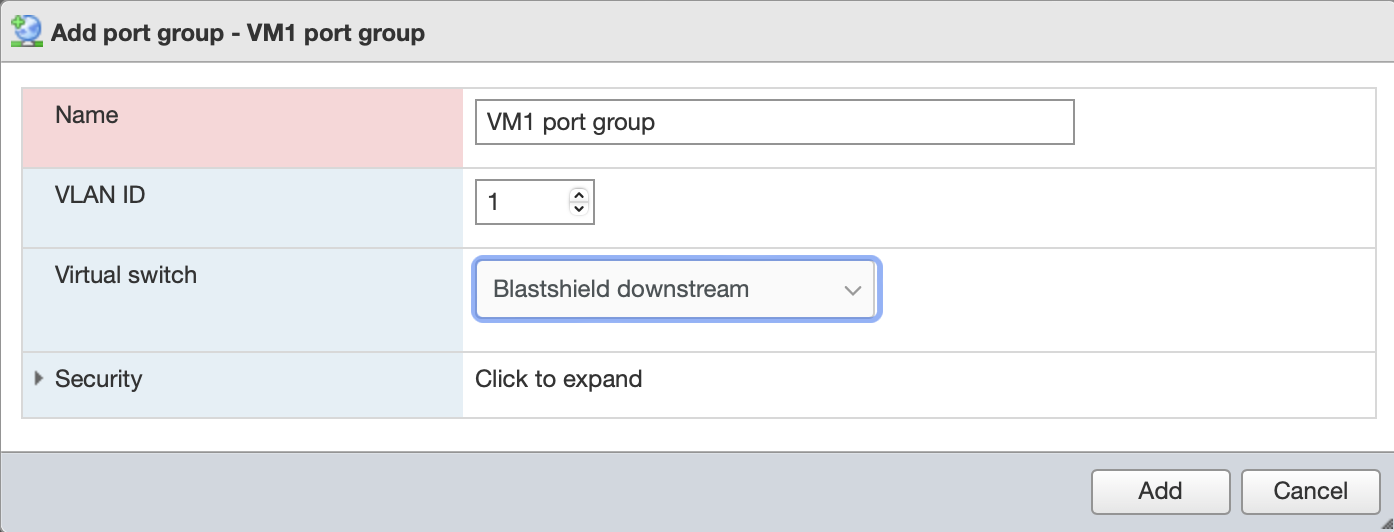
Repeat for every VM endpoint that you wish to add to the Gateway, using a unique VLAN ID for each endpoint.
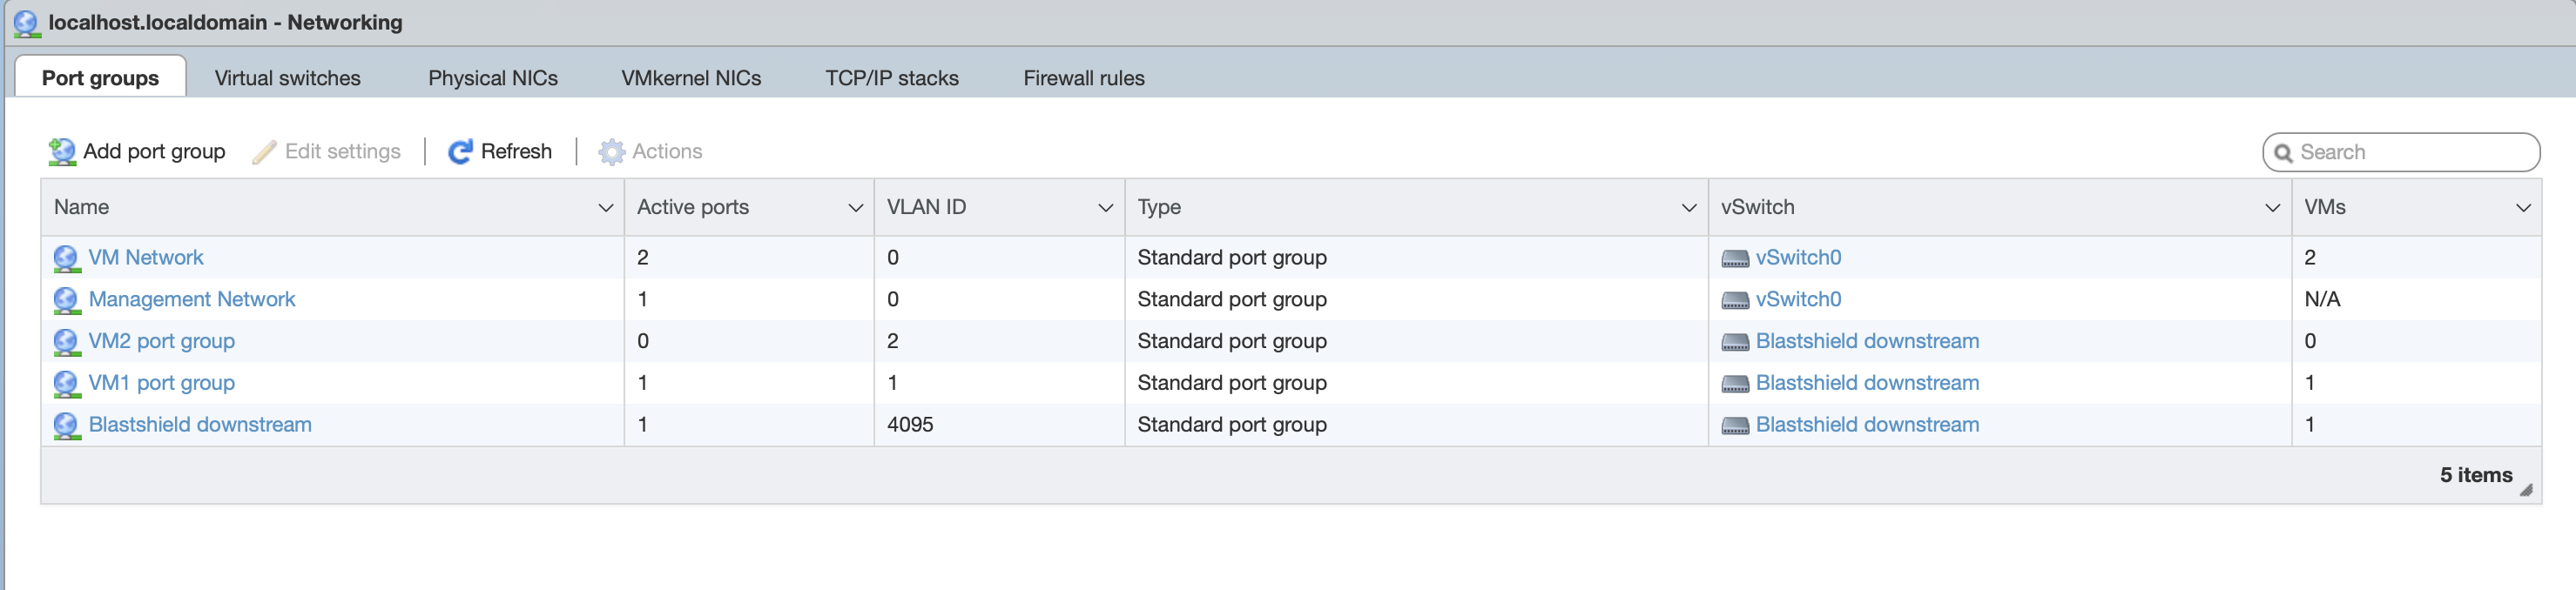
The port groups are shown below. This example has two endpoint port groups (VM1 and VM2).
Add a new Gateway in the Orchestrator.
Connect to the Orchestrator and select Gateways from the left Menu.
Select Add New Gateway from the Gateway List.
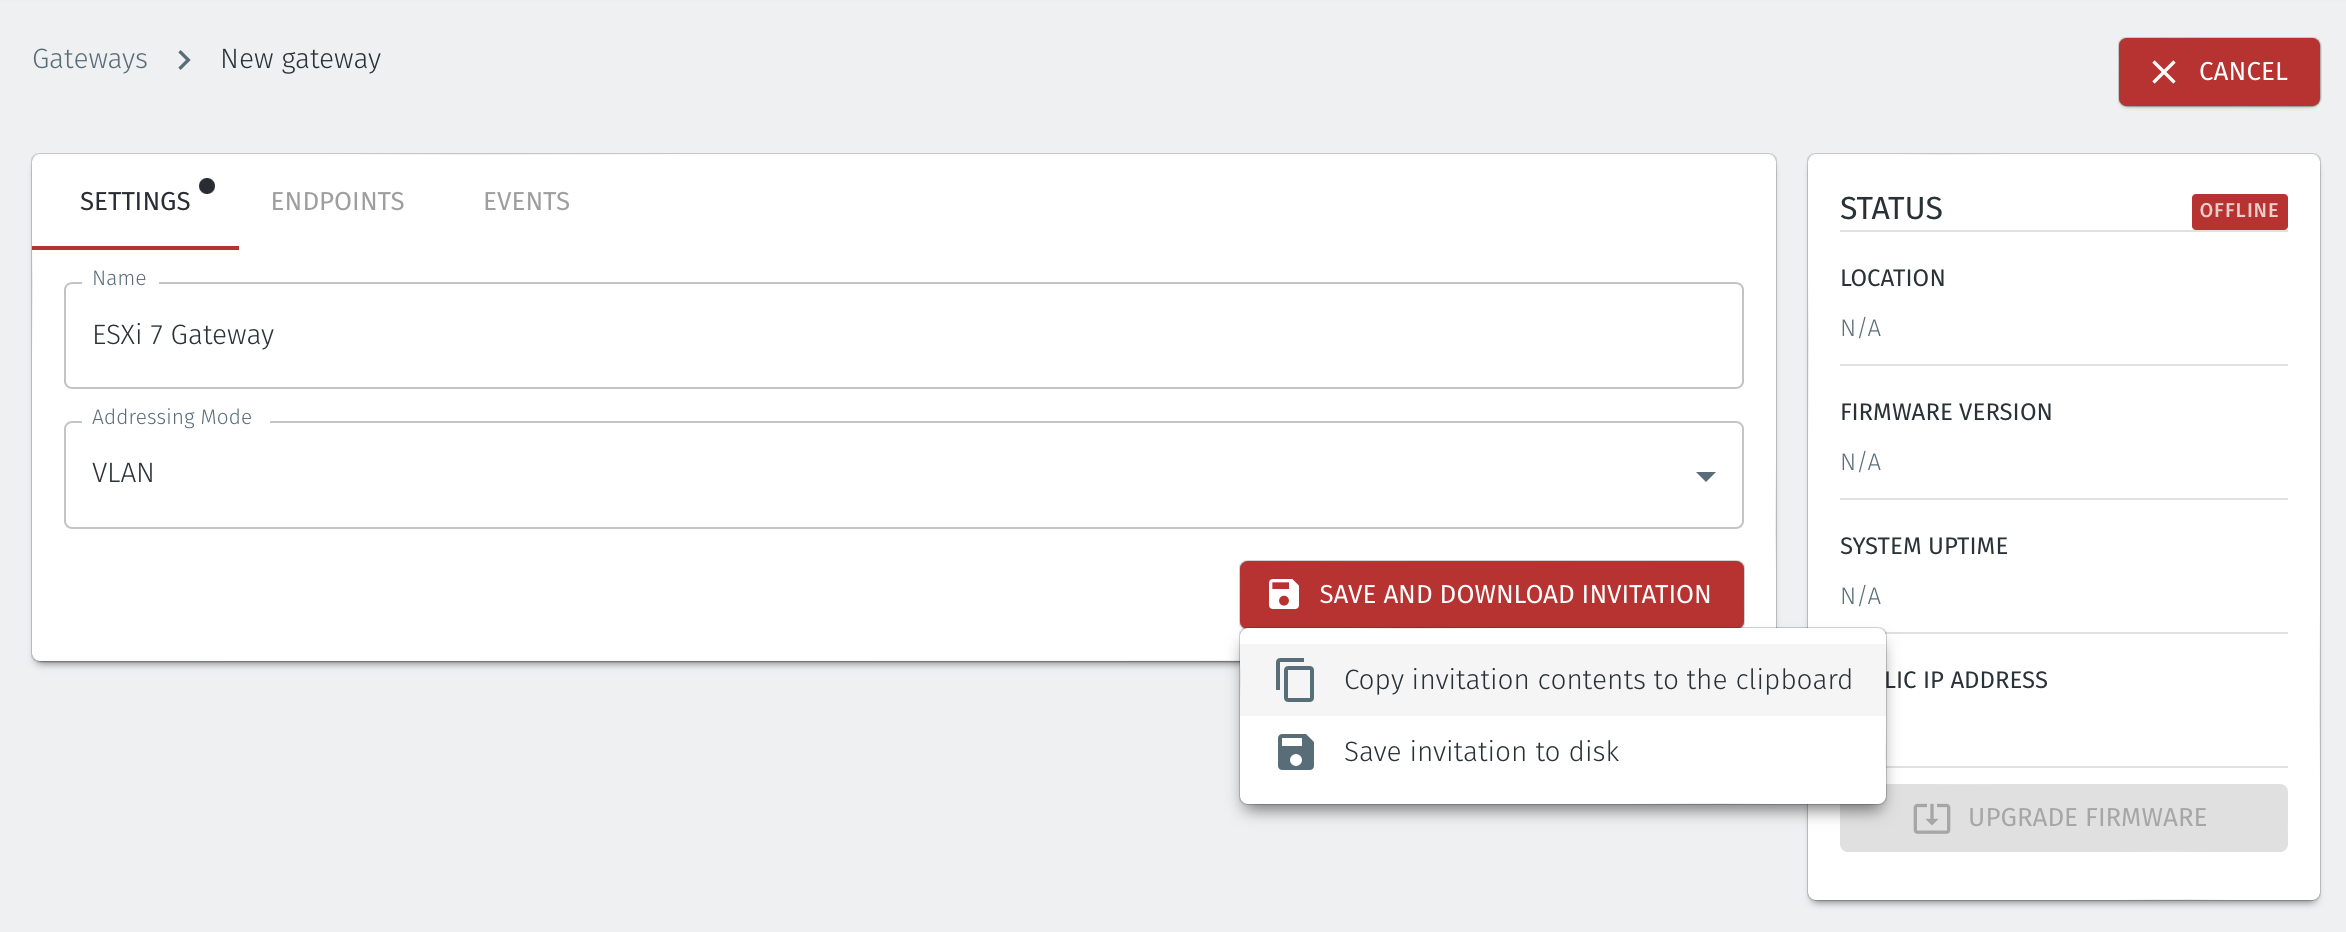
Enter a name for the new Gateway.
Select the Addressing Mode for the Gateway to be VLAN.

Select Save and Download Invitation. You can chose to either download the invitation file or copy the contents to the clipboard. Retain the invitation file data as you will need it later when you install the Gateway OVA.
Download the Gateway OVA file.
Download the Gateway OVA file from here and keep it available so that you can upload it to your ESXi server.
Install the BlastShield Gateway™ OVA file on the ESXi client.
Using the VMWare ESXi new virtual machine installer, the Invitation (.bsi) file generated in step 1 and the OVA file you downloaded in step 2 you will install the software on your ESXi hypervisor and bind it to the BlastShield™ Network. Below are the steps for this process.
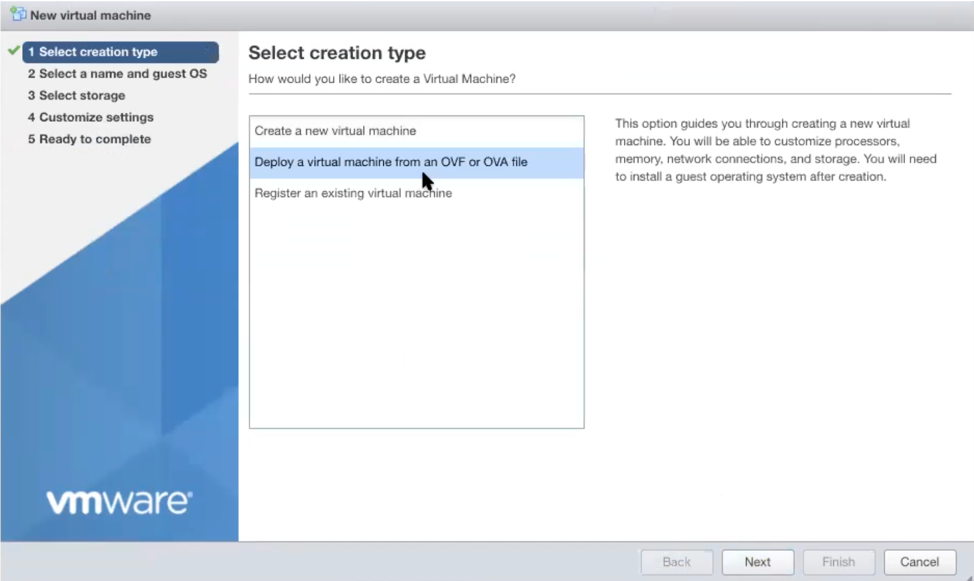
From the ESXi host, go to Virtual Machines / Create /Register VM / Create a virtual machine from an OVF/OVA file.
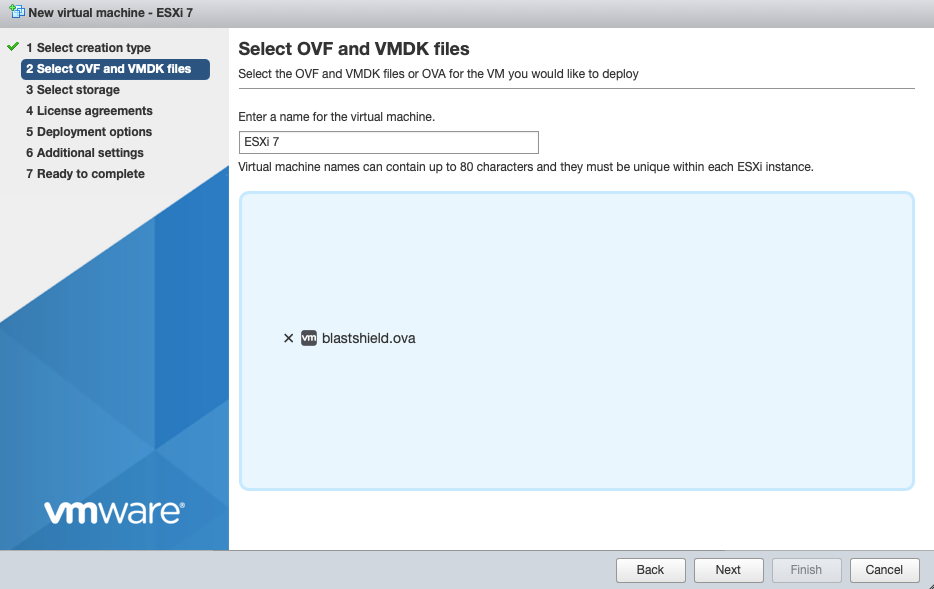
Give the new Gateway a name and select the BlastShield™ OVA file which you downloaded in the previous step.
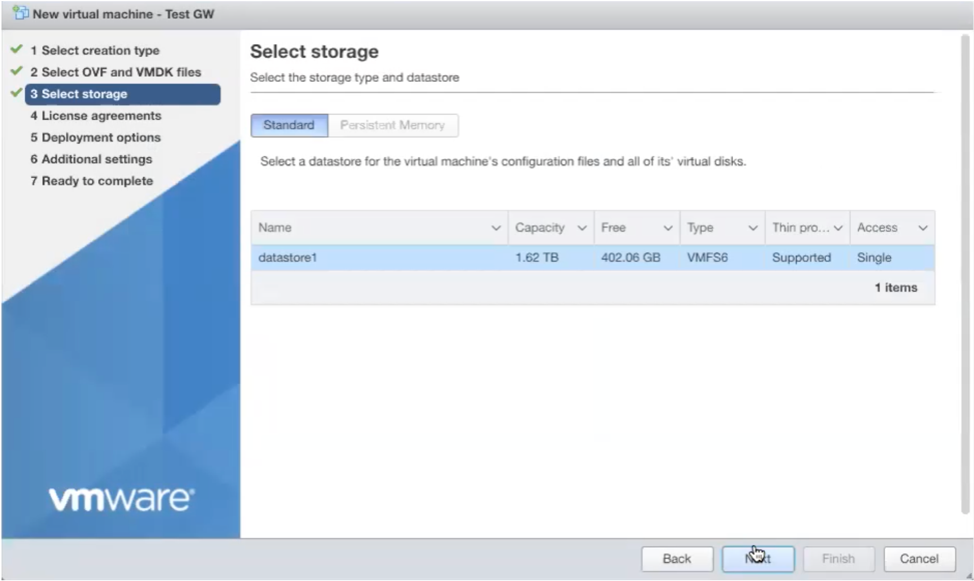
Leave the default datastore option.
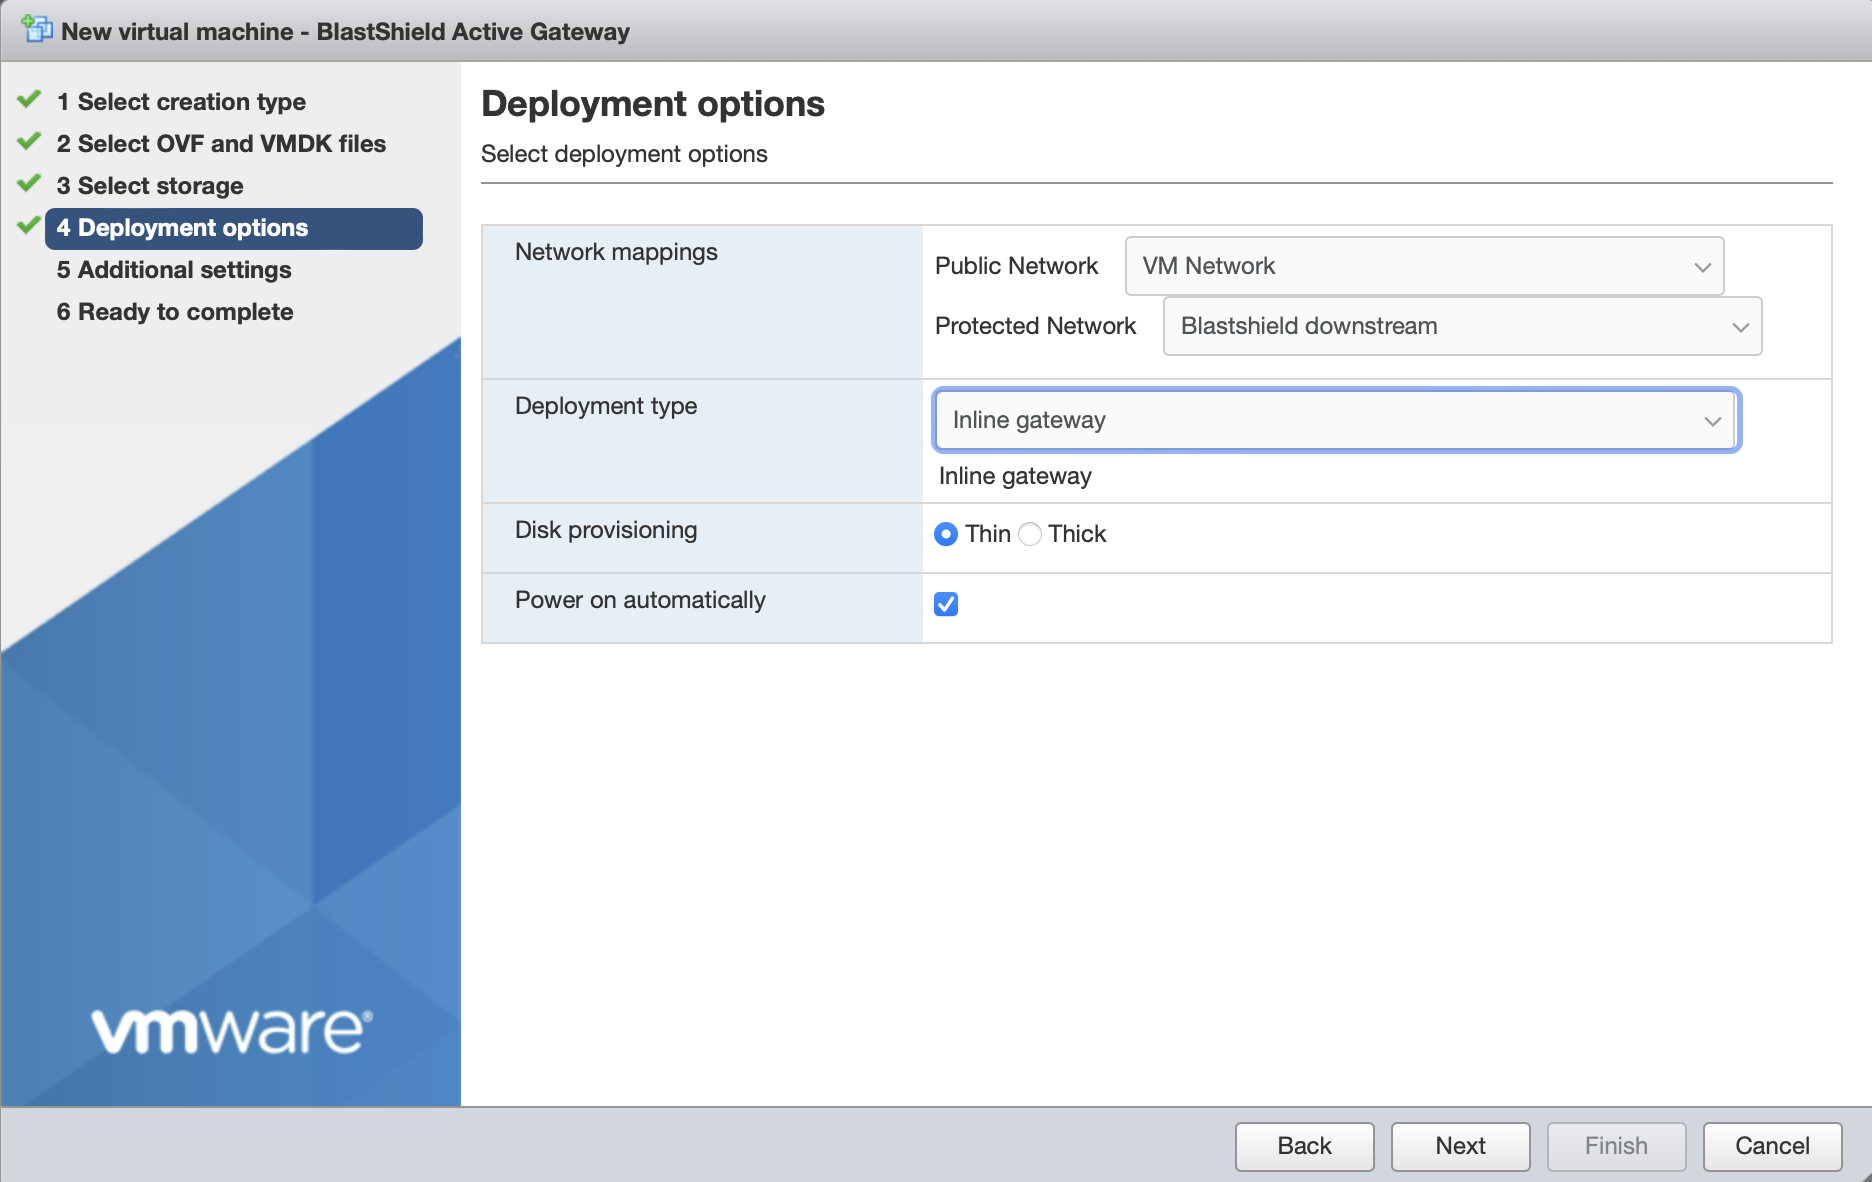
Set the deployment options as shown:
Public Network: VM Network port group.
Protected Network: BlastShield Downstream port group.
Deployment type: Inline gateway
Leave the other settings as default.
In Additional Settings, add the contents of the bsi file.
BlastShield Invitation / Invitation contents (BSI): Paste the contents of the Gateway bsi file into the Invitation contents field.

Network Configuration
The network configuration sets the Gateway's local IP address, default gateway and DNS. For an inline Gateway, this refers to the upstream interface.
To use DHCP to assign the IP address, default gateway and DNS, leave all three boxes blank in the Network Configuration section. This is the default option.
If you are setting a manually assigned IP address, default gateway and DNS, then enter them in the Network Configuration boxes as described below.
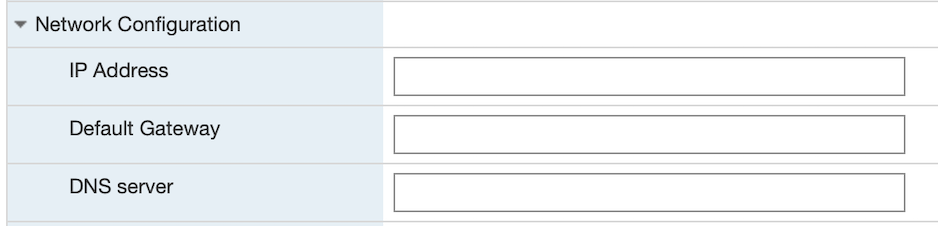
In the IP Address field, enter the IPv4 address and prefix length of the upstream network interface in CIDR format.
In the Default Gateway field, enter the default gateway IPv4 address for the upstream network interface.
In the DNS server field, enter the IPv4 address for the upstream network interface. If left blank, the Gateway will try public DNS.
There is no need to add an SSH key for a Gateway installation. This will be automatically provided by the Orchestrator.
Click next, then click finish to add the new Gateway virtual machine.
Tip
You can verify the Gateway has started by watching the console output in the hypervisor. When the Gateway is running and connected, the status in the Orchestrator will indicate ONLINE as shown in the image below.

Troubleshooting if your Gateway status does not come Online
Ensure you have pasted the contents of the bsi file from the Orchestrator into the Additional settings step of the Create/Register VM procedure when you install the Gateway OVA on the hypervisor.
If your hypervisor environment is not running a DHCP server, make sure you have manually configured an IP address in the Network Configuration section of the Additional settings step of the Create/Register VM procedure on the hypervisor. You can manually enter an IP address, default gateway and DNS server in the Network Configuration.
Verify that you have configured the correct Public and Protected networks in the Deployment Options step so that the Gateway is able to access the externally facing physical interface.
Ensure there is outbound network access on the hypervisor, so that the Gateway VM can communicate with the BlastShield™ Orchestrator.
Outbound UDP ports to all required destinations.
Resolution of DNS requests must be supported by the network.
For each of the VMs on the hypervisor that you want to securely connect to the BlastShield™ Gateway, you must create a corresponding Endpoint for it on the Gateway. The Destination (VLAN) parameter of the endpoint in the Orchestrator must match the VLAN ID of the port group which you have assigned to it in the ESXi client.
Follow this procedure to learn how to create an endpoint on the Gateway for each virtual machine that you want to protect.
In the ESXi client, configure a unique VLAN ID for the protected guest VM by setting the port group ID.
In the ESXi client, select Virtual Machines from the left hand menu.
If you have already created the VM, the select it from the displayed list and click on it to bring up the status page.
From the menu at the top of the main window, click on Edit. The Edit settings window for the VM will open.
Ensure that the Virtual Hardware tab is selected and go to the Network Adapter setting.
Set the Network Adapter to one of the port groups you created on the Downstream vSwitch when you configured the network settings. The port group is configured to set the VLAN ID to a unique value which is replicated in the Orchestrator endpoint configuration.
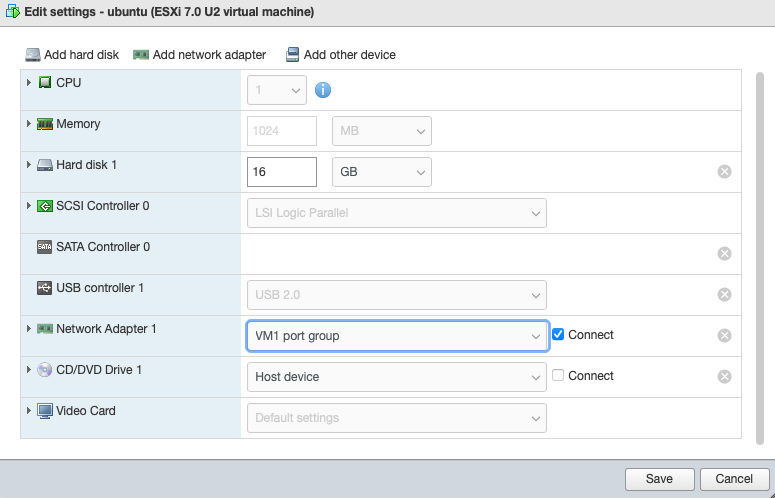
In this example the VM will have VLAN ID = 1 set in the Orchestrator. This will use port group VM 1, with VLAN ID = 1 on the hypervisor.
Click Save to save the changes.
If you are creating a new VM, then follow the default process in the ESXi client to Create / Register VM
In the Customize Settings step, go to the Network Adapter setting.
Set the Network Adapter to one of the port groups you created on the Downstream vSwitch when you configured the network settings. The port group is configured to set the VLAN ID to a unique value which is replicated in the Orchestrator endpoint configuration.
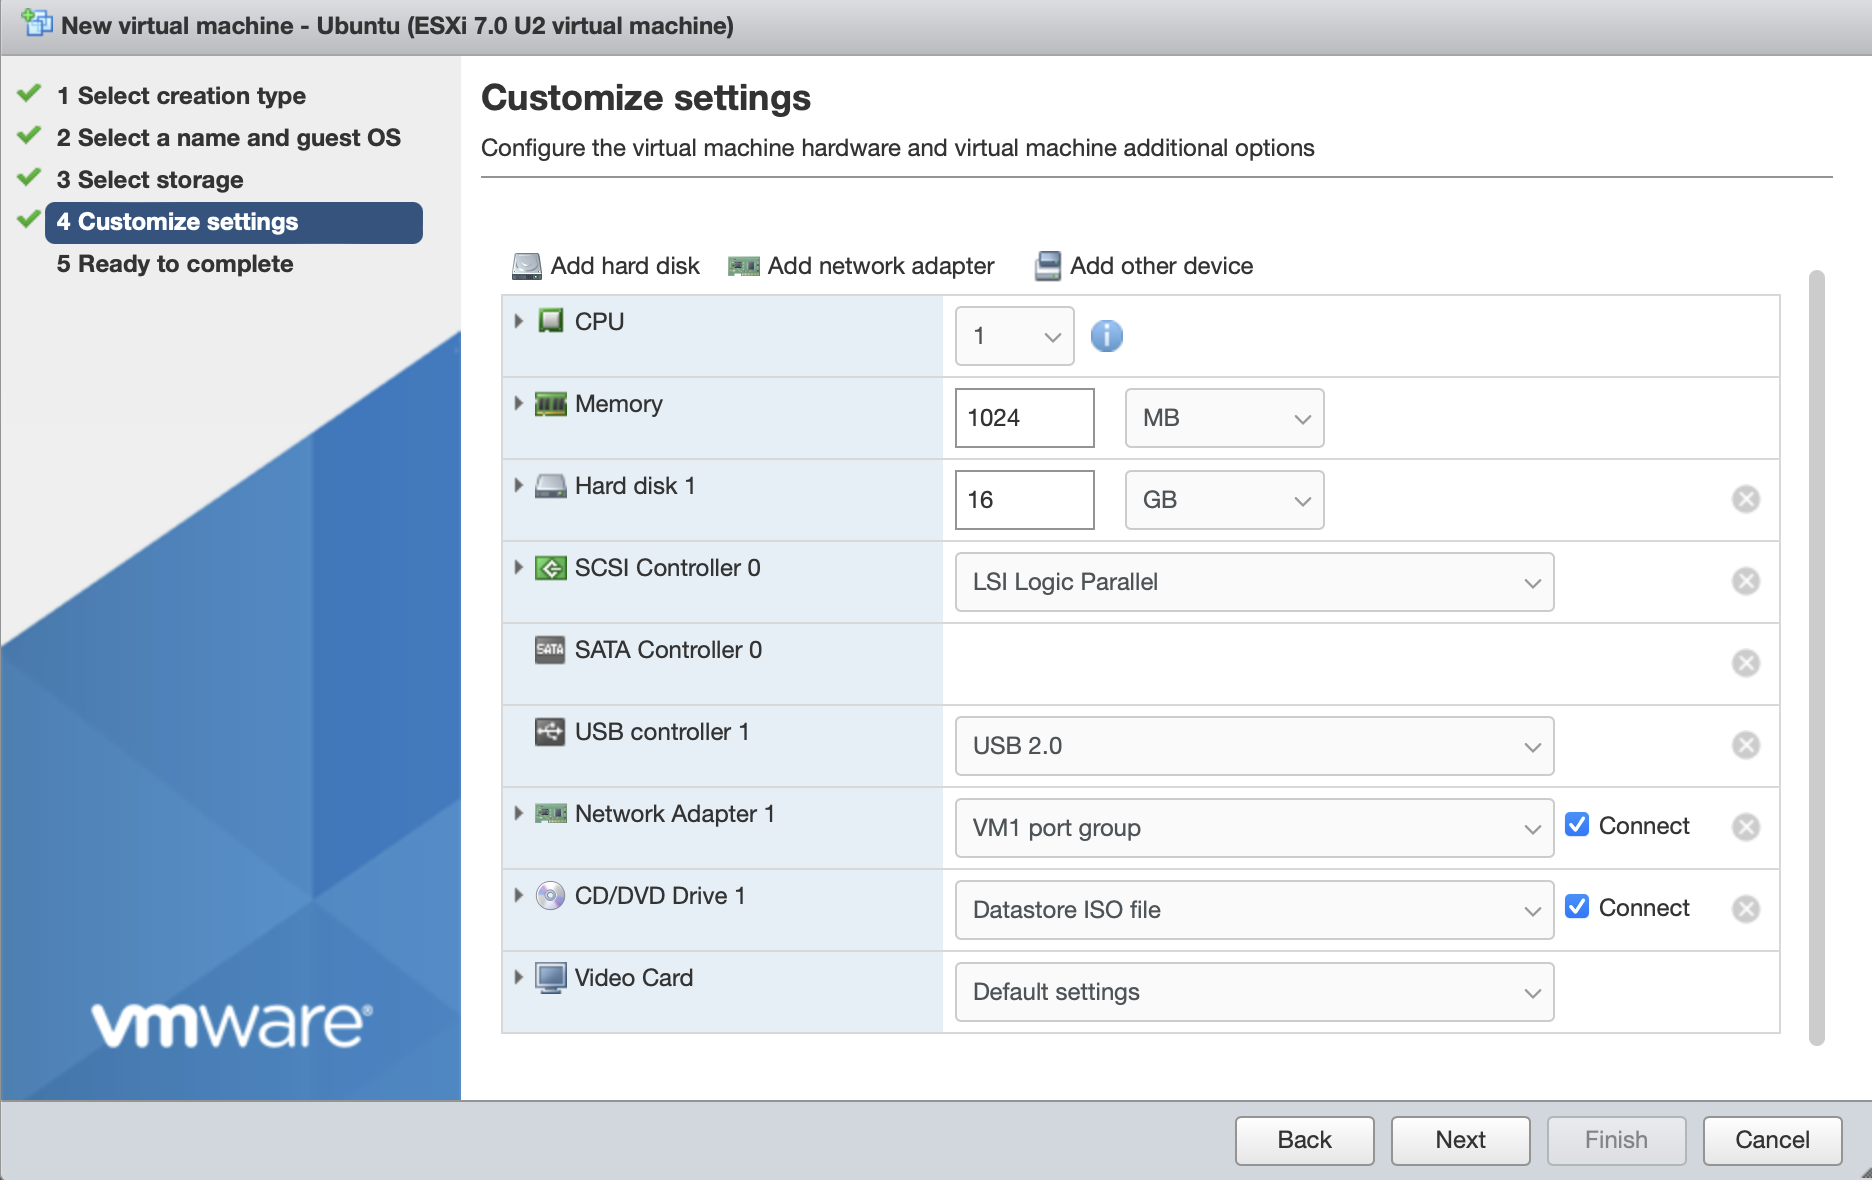
In this example the VM will have VLAN ID = 1 set in the Orchestrator. This will use port group VM 1, with VLAN ID = 1 on the hypervisor.
Follow the rest of the Create / Register VM process as normal to create the VM.
In the Orchestrator, configure an endpoint to match the ESXi guest VM with the same unique VLAN ID configured as the destination address.
In the Orchestrator, select the VMware ESXi Gateway and click on the Endpoints tab.
Click the 'Add New Endpoint' button and click on the 'Endpoint Enabled' button.
Name: Enter a name for the endpoint
Endpoint Enabled: Check this box to enable the endpoint.
DNS Hostname : Enter a hostname for the endpoint.
Destination (VLAN): Enter the endpoint's VLAN ID. This must match the VLAN ID of the port group which you have assigned to it in the ESXi client.
For example, this VM will have VLAN ID = 1 set in the Orchestrator. This will use port group VM1, with VLAN ID = 1 on the hypervisor (see the previous step, above).
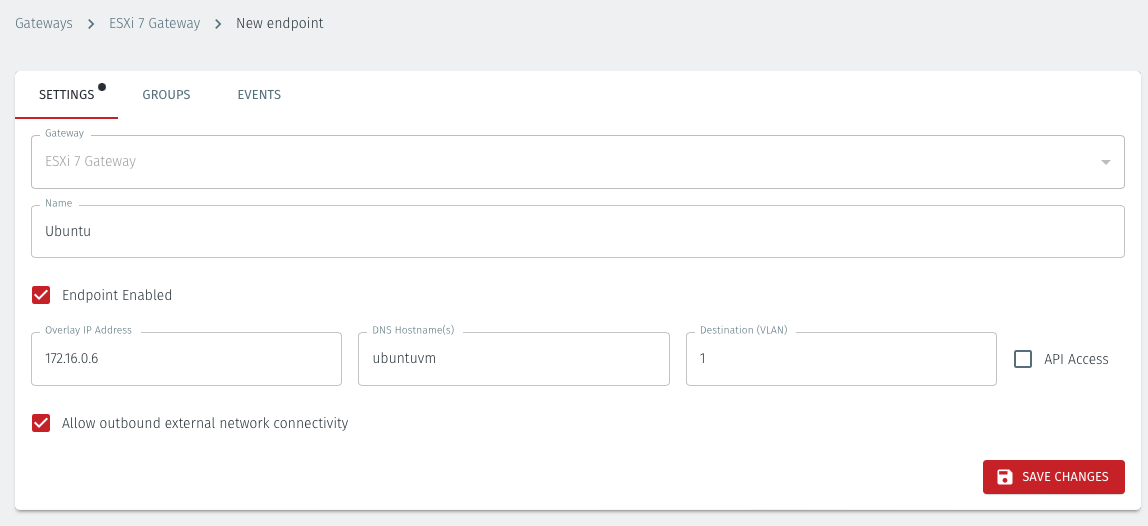
Allow outbound external network connectivity:
Check this box if you want to allow the endpoint to be able to communicate out through the Gateway, for example to download software updates.
Leave this box unchecked if you do not want the endpoint to be able to communicate out through the Gateway. This will provide endpoint isolation (virtual air-gapping) but will allow authorized users and nodes to connect to the endpoint.
Click on Save Changes.
The status of the Endpoint will show as ONLINE.
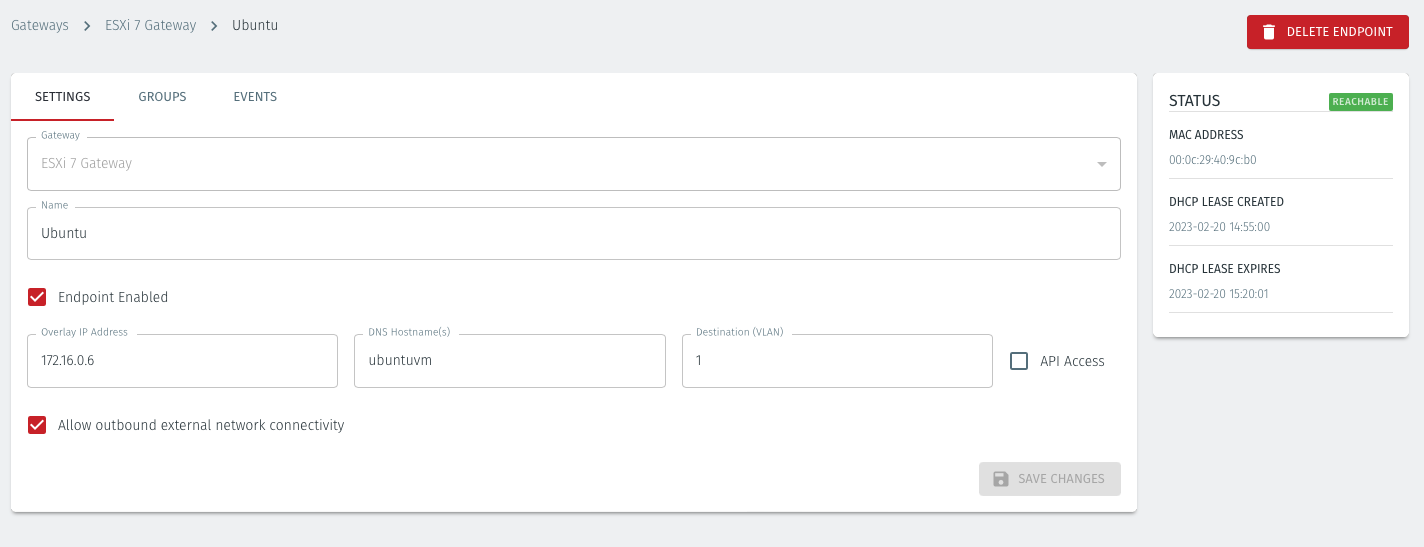
Repeat, as necessary, for your other endpoints.
Troubleshooting if your Endpoint status does not come online
Check that your Gateway is Online. If not refer to the troubleshooting steps earlier.
Verify you have configured the appropriate network adapter on the virtual machines.
Verify the Port Groups and vSwitches have been configured correctly.
About Groups
Groups allow you to micro-segment users and endpoints. A group is a logical collection of endpoints and/or users that are grouped together. Groups are connected via policies, which form the foundation for BlastShield access control and segmentation management.
Any combination of endpoints and/or users can be grouped together.
There is no limit to the number of endpoints and/or users that can be in a group.
Endpoints and users can be in one or multiple groups simultaneously.
Groups are linked together via policies to provide access between endpoints.
By default, endpoints/users cannot access or have visibility to other endpoints/users unless they are granted access via a policy
About Policies
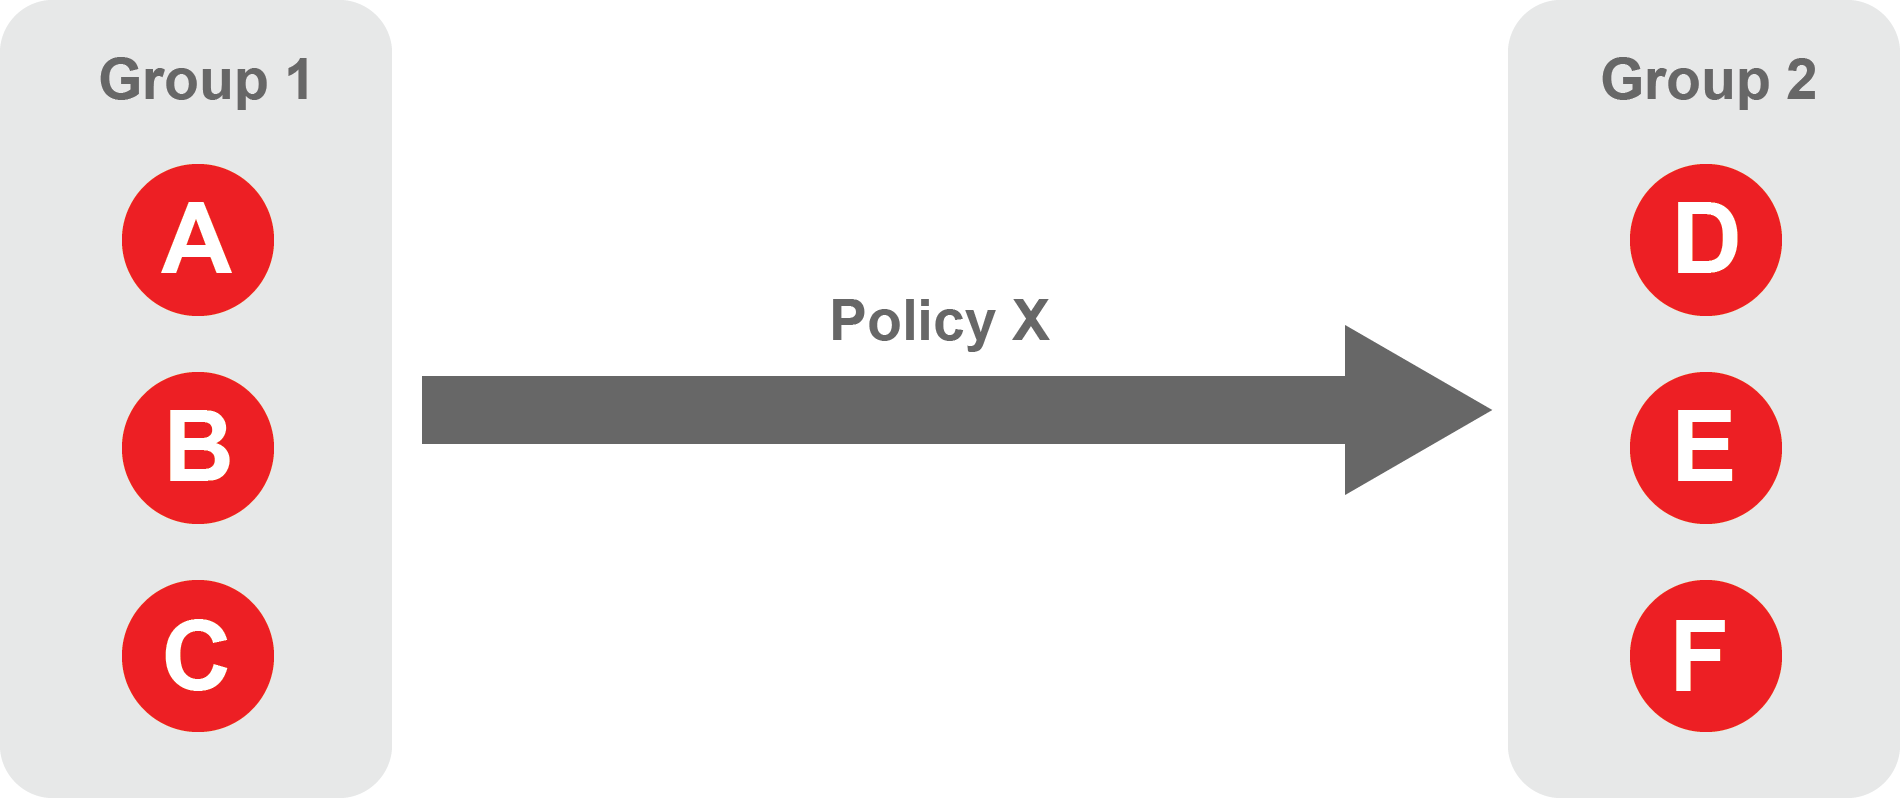
A policy defines how groups can interact. Groups are connected via policies, which form the foundation for BlastShield access control and segmentation management.
Each policy will have two sets of groups - "From" and "To".
The "From" set is one or more source groups.
The "To" set is one or more destination groups.
There is no limit to the number of groups in a given policy.
"From" Groups will have access to "To" Groups within the policy.
"To" Groups will not have access to "From" Groups within the policy.
Groups can be in one or multiple policies simultaneously.
 |
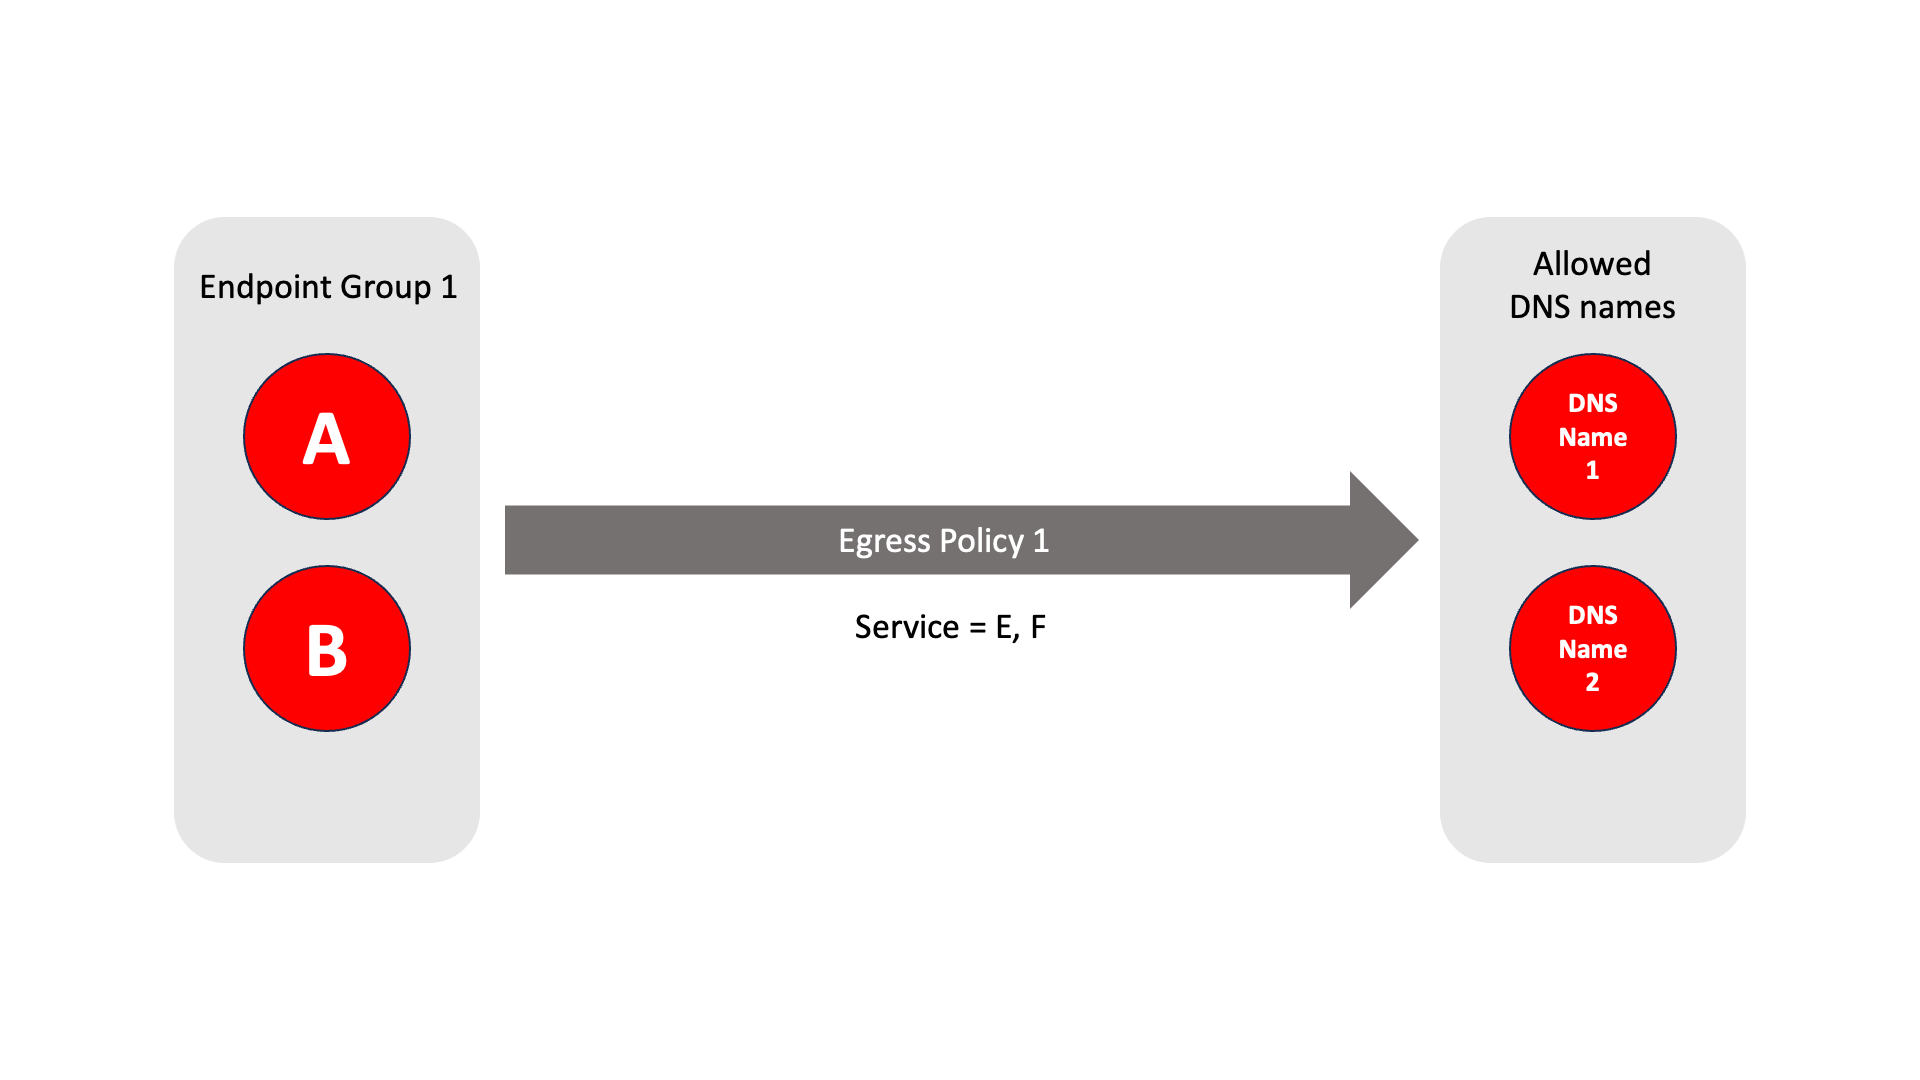
About Egress Policies
Egress policies allow you to control external network access for Gateway endpoints which are isolated behind a Gateway. This enables endpoints to connect to external entities, for example to download a software update or to connect to an NTP server.
The endpoint group contains the endpoints which the policy applies to.
The allowed services are E and F.
The network prefixes or DNS names define the allowed external network destinations for the endpoint group.
 |
Create Groups
From the Orchestrator, select "Groups" from the left menu.
Select "Add New Group" from the Group List.
Enter a name for the new Group.
To add members to the new group, click the "Add Members" button.
If you adding users to the group then select the desired Users which you want to be associated with the Group from the "Users" box.
If you are adding Agents to the group then select the desired Agents which you want to be associated with the Group from the "Agents" box.
If you are adding Gateway Endpoints then select the desired Endpoints from the "Endpoints" box.
Alternatively, you can leave the members list empty and add/modify new members later.
Click "Add Members" to save the members.
Click "Save" to save the new group.
Repeat, if required, to ensure you have one group for your endpoints and one group for your users, which is the minimum you will need in order to define the access policy.
Please refer to the following video, which is an example of creating one group for your users and one group for Host Agents.
Create a Policy to link your Groups
Note
Users and Agents must be a member of a group for them to be used in a policy.
Select "Policies" from the left menu.
Select "Add New Policy" from the Policy List.
Enter a name for the new Policy.
Select desired "From" Groups to be associated with the new Policy.
Select desired "To" Groups to be associated with the new Policy.
Save the new Policy.
Policies are directional, so that you can control the direction in which connections may be initiated. Typically for remote access use-cases your policy would be from the "user group" to the "server group" so that users may start connections to the servers, but servers cannot start connections to users. You can create bi-directional permissions by using two policies.
The following video shows an example of creating an access Policy between a group of remote workers and a group of servers. The policy gives the remote workers authorisation to access the server group.
Create an Egress Policy
Egress policies are required only if a Gateway endpoint requires external network access.
Egress policies allow you to control external network access for Gateway endpoints which are isolated behind a Gateway. This enables endpoints to connect to external entities, for example to download a software update or to connect to an NTP server.
The Egress Policy menu in the Orchestrator allows policies for external network access to be configured on a per-endpoint group basis, where the groups are defined in the Orchestrator Groups menu. Allowed destinations may be defined either by network prefix or by DNS names and the policy may be further controlled by specifying an allowed service. An egress policy may be enabled or disabled from the Orchestrator if the external network access is only temporary.
From within the Orchestrator, select Egress Policies from the left Menu.
Select the red "Add New Policy" icon.
Enter a name for the new Policy.
Check the Policy Enabled box to enable the policy and continue with the configuration.
Select the desired endpoint Groups to be associated with the new Egress Policy in the Endpoint Groups dropdown box
Select any optional Services groups to be associated with the new Policy in the Services dropdown box.
If you want to allow external DNS queries in the policy, then check the Allow all DNS queries box.
Specify the allowed destinations for the Egress Poicy as required using the following options:
In the Allowed Prefixes box, define an allowed external IP address and prefix
in the Allowed DNS Names box, define an allowed external DNS name.
To allow recursive DNS queries, check the Recursive box.
Click Save Changes to save the new Egress Policy.
Summary
This step is optional. Moving the VMware kernel interface behind the BlastShield™ Gateway will additionally secure the administrator access to the VMware hypervisor.
This process involves moving the VMware Admin interface from vSwitch0 to the Blastshield downstream vSwitch. This has the effect of placing it in the protected BlastShield™ Network.
Important
You must have already configured the VMware networking and installed the BlastShield™ Gateway on the hypervisor before you start this procedure.
This process is optional.
This process will interrupt access to the ESXi management port. After this procedure is carried out, only authenticated and authorised BlastShield™ users will be able to access the ESXi host.
This procedure will lock out unauthorised users from the ESXi administration interface, so please make sure you back up the system before you start, and that you follow the instructions below to mark the BlastShield™ Gateway VM as auto-starting in the hypervisor.
Starting Configuration with the VM Kernel interface on vSwitch 0.
 |
Final Configuration with the VM Kernel interface moved onto the secure BlastShield™ Downstream vSwitch.
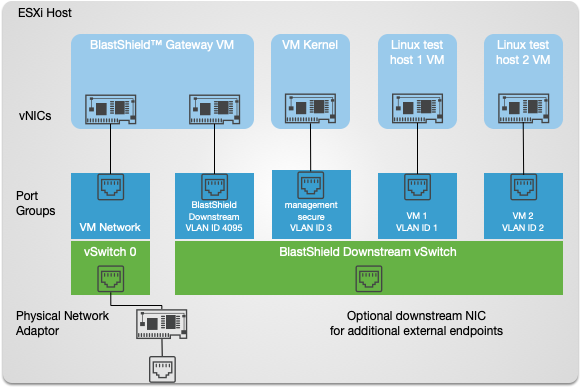
Procedure to move the VM Kernel interface to the BlastShield™ Downstream vSwitch
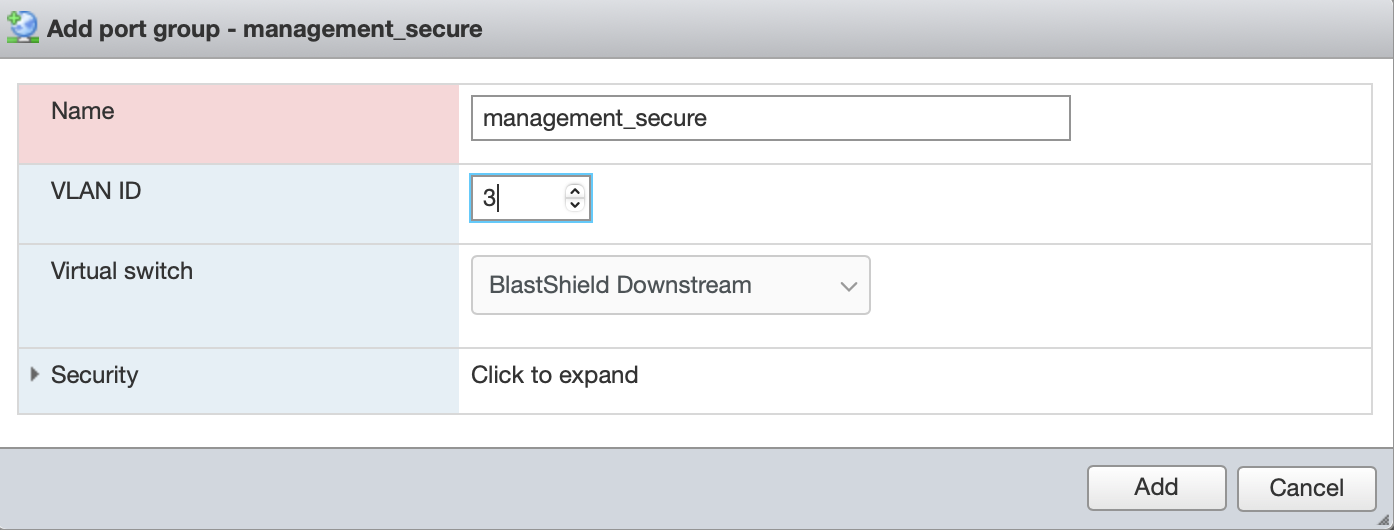
Create a new port group in VMware ESXi.
From the ESXi host web ui: - Create the port group in the vSwitch with a suitable VLAN ID and add the matching endpoint in the BlastShield™ orchestrator. In our example we will use the name "management_secure" as the new port-group name. and assign it VLAN ID = 3. This new port-group is then connected to the ‘BlastShield Downstream’ vSwitch as shown below.
Add the corresponding endpoint in the BlastShield™ orchestrator.
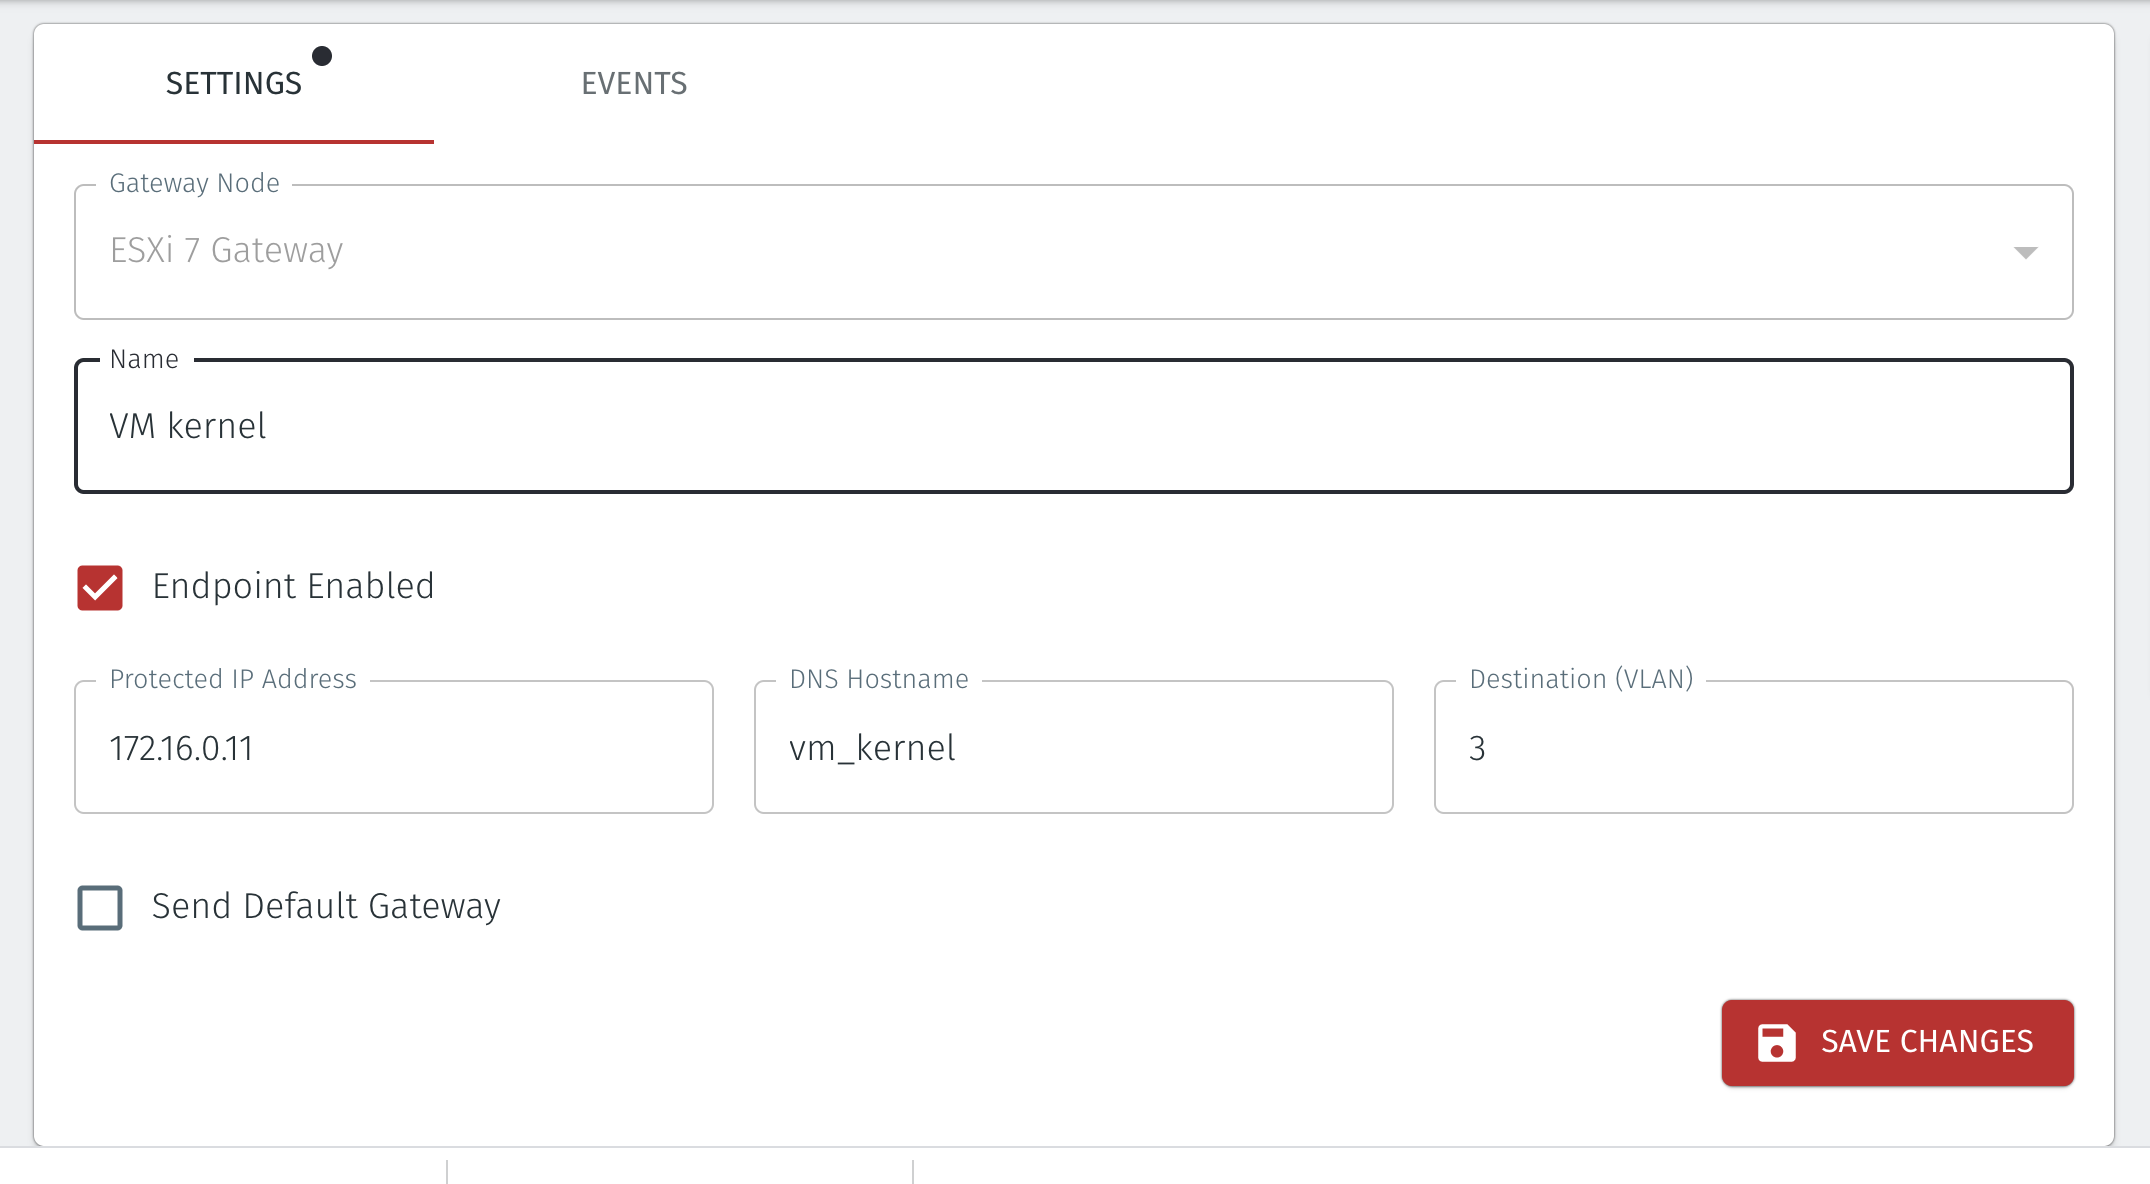
In the Orchestrator, create a new Endpoint for the VM kernel:
Name: VM kernel
DNS Hostname: vm_kernel'
Destination (VLAN): 3
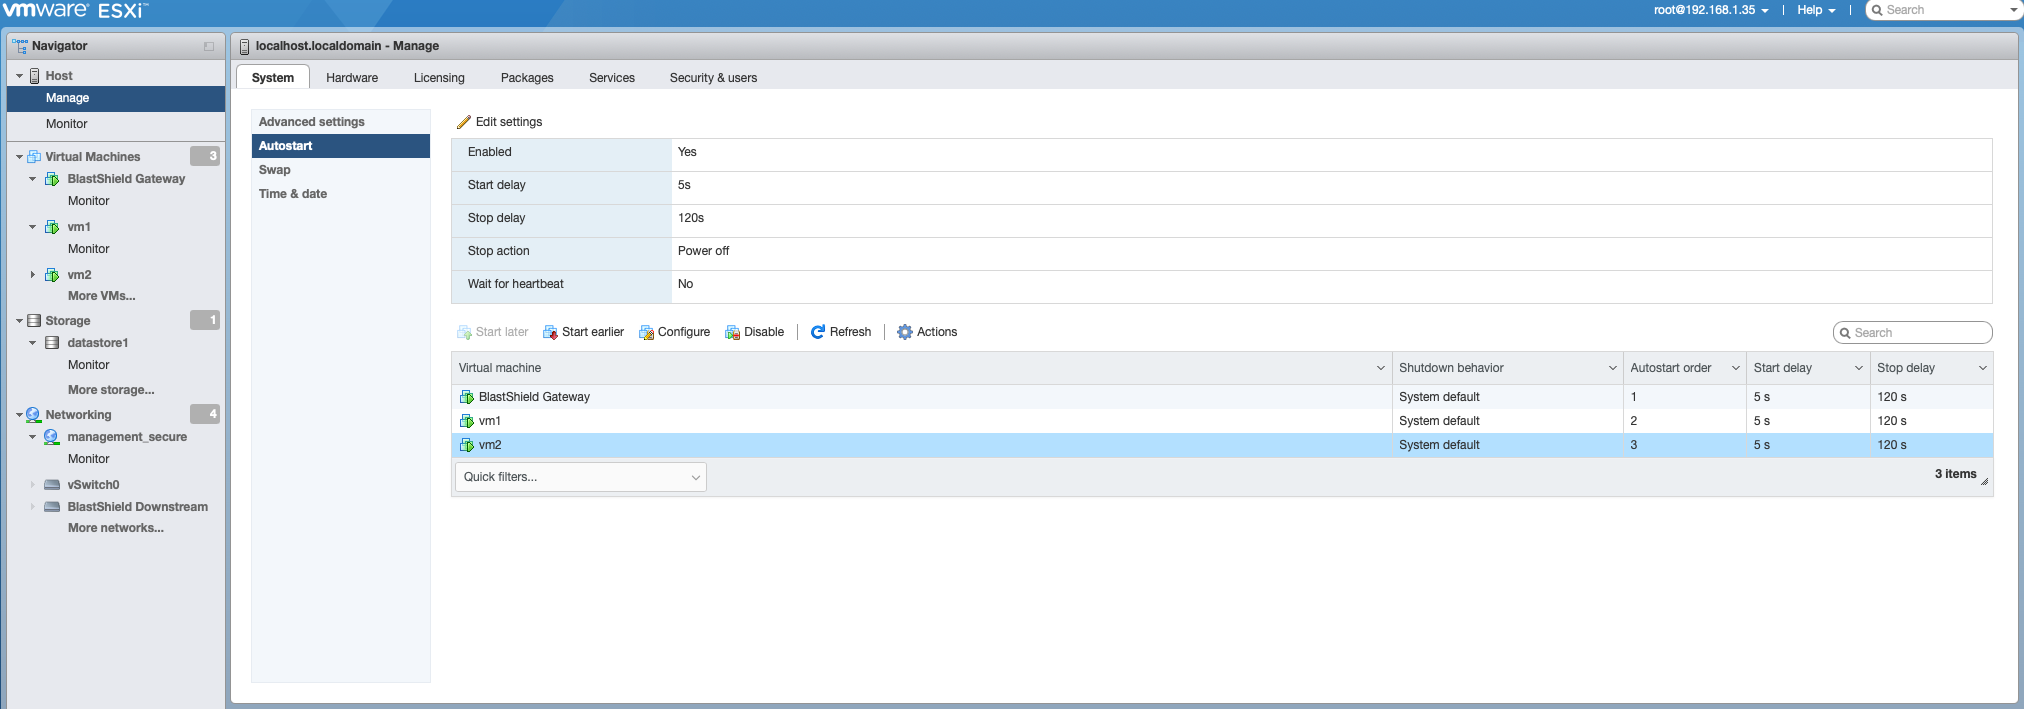
Mark the BlastShield™ Gateway VM as auto-starting.
Login to the ESXi host web UI and go to the Manage Host/ system options as shown below. Mark the BlastShield™ gateway VM as auto-starting
Important
This is important, since otherwise the VM Kernel will be unreachable when the system starts
Delete the VMkernel interface that you want to migrate from the port group to which it belongs.
Important
For this step and the following step you must login to the console on the host. The change will interrupt remote access. After this step, only authenticated and authorised BlastShield™ users will be able to access the ESXi host.
On the VMware console enter the following command. Replace "Management Network" with whatever your current management port group is named. Management Network is the default though.
esxcfg-vmknic -d "Management Network"
Create a new interface for the one which you removed in the previous step and add it to the Port Group you created.
On the VMware console enter the following command:
esxcfg-vmknic -a -i DHCP -p "management_secure”
Now the VM Kernel will be connected via the protected BlastShield™ Downstream vSwitch.